Friday, April 13, 2018

My Creative Scrapbook April Tutorial

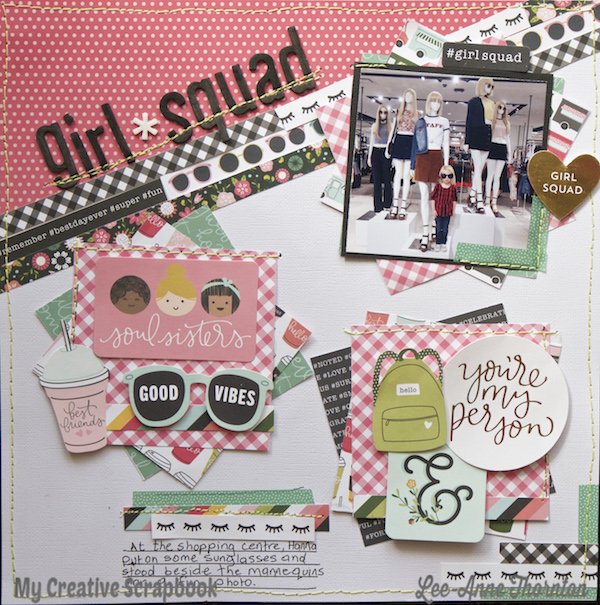
Hello friends! Today I wanted to share a quick tutorial on how I altered my white foam alphabet stickers that were included in the April Creative Kit for My Creative Scrapbook.

To alter the white foam alphabet stickers on the layout below, I used a black Faber Castell Pitt Big Brush Pen. These pens come in an assortment of colors, are permanent India ink and won't bleed. The ink dries quickly and I have found they are perfect for this technique. The pens are also used in mixed media and stamping images instead of an ink pad. I wanted to alter my title "Girl Squad" in black to coordinate with my layout.


I created a short video on how to do this. Beware, I am a newbie at making videos, but practice makes perfect right? When I get more experienced at this, I will add my voice.
Check it out here:


Thanks for stopping by and I hope I have inspired you to alter your white foam alphabet letters for your projects.

Have a wonderful day!

Thursday, April 12, 2018

Pink Floyd Concert


Hello friends!

I was asked by the lovely Laurel Seabrook to be a guest designer for the Inspired By Challenge Blog and I was more than happy to create a layout.


Last October, my youngest son turned eighteen years old and because it was a milestone birthday, my husband and I surprised him with a trip to see his favorite band Pink Floyd in concert.

To begin, I used my We R Memory Keepers Stitch Happy Sewing Machine and the Stitch Happy Thread in the color citrine and stitched a random design on the white card stock background. 

I wanted to add a guitar to the layout so I found the I Wanna Rock digital cut files from Just Nick Digital Cut Files, and cut them out with my Silhouette Cameo. 


For the guitar, I first cut the arrow patterned paper and then offset the design in the Silhouette Studio software and cut the guitar design out on black card stock as well as a few other designs for my layout.


Once I was done with the cutting, I had a lightbulb moment to use gold thread for the frets and black thread for the strings. I thought some pewter sequins would be great to embellish the head of the guitar. 

Of course I had to use some flair buttons that I have been waiting to use from the Rock On 3 Flair Set and the Hello Weekend Flair at A Flair For Buttons.  They were placed in a triangle design on the layout to draw the eyes around the page. 


The grey alphabet stickers for the title and the patterned papers were from Bella Blvd.'s Alex Collection. I outlined the alphabet stickers with a black fine line felt pen and then placed them on a border sticker and took my sewing machine and stitched across the title to make sure that they were going to stay put. 


I wanted to make sure that there was lots of dimension on my page. 


Once I had completed the layout, I thought the page didn't look complete and was missing something  so I decided to use the packaging technique and my Distress Oxide in Bundled Sage to add some mixed media to the layout. I think it gives it more of a grungy look and I was happier with the result. 


I think my son will like having a scrapbook page for this special memory.

Thanks for stopping by and I hope you have a creative day!

Flair Used On Layout


Digital Cut Files On Layout


Tuesday, April 10, 2018

Bloom

Hello friends! Today I wanted to share a layout that I created for A Flair For Buttons using some flair from the new Watercolor Splatters Flair Set. 


As soon as I saw these flair, I knew that I wanted to add them to my layout. I chose the green, pink and blue flair buttons from the set to add to my layout. The colors coordinate perfectly with the colors of my layout. I strategically placed them in a triangle to draw the eyes around the page.


I put my We R Memory Keepers Stitch Happy Sewing Machine to work and machine stitched in pink, aqua, and citrine thread on the white card stock background. When I planned out the page, I wanted to stitch a design that would draw the eye to the flower. 


The photo was matted on some papers from the new Photoplay Paper Mad For Plaid Happy Collection. I really love the plaid and the colors in this collection. Also, I added some stickers popped up with foam dots, and die cut some butterflies on vellum and wrapped some citrine thread around the centers of the butterflies.


The cut file and title were free digital cut files from Scrapbook Nerd. I cut the title on black card stock and the floral cut file on white card stock with my electronic die cutting machine. I wanted the title to really pop so I added some faux stitching with a white gel pen.

 For the floral cut file, I used some Vicki Boutin Art Crayons and water to paint the flowers and added some enamel dots to the middle of the flowers.


I am really pleased how my layout turned out.

Thanks for stopping by and be sure to check out the A Flair For Buttons shop to view hundreds of flair sets for every theme.

Thanks for stopping by.

Flair On Layout

Watercolor Splatter Flair


Thursday, April 5, 2018

April Kits Reveal

Hello friends! Yay! It's reveal day of the four kits at My Creative Scrapbook and they are fabulous!

My Creative Scrapbook April 2018 Main Kit
My Creative Scrapbook April 2018 Creative Kit

My Creative Scrapbook April 2018 LE Kit

My Creative Scrapbook April 2018 Album Kit
I was asked to create some projects with the April Creative Kit and I had a lot of fun with the exclusive electronic cut files (included in each month's kit) that I cut out on my electronic die cutting machine. The papers and embellishments are mostly from the Pebbles Inc. Girl Squad Collection. I have three layouts to share and will be adding some later this week. 


I hope you are inspired to create and also, be sure and check out the My Creative Scrapbook website to see who is guest designing this month as well as the always amazing designer gallery for more inspiration.

Have a lovely, creative day!

Tuesday, April 3, 2018

April Sneak Peeks

Hello friends! Can you believe it's April? I am finding it very hard to believe because there is still a ton of snow where I live and the temperatures are very cold.

The sneak peeks are here for the April 2018 kits at My Creative Scrapbook and they make it feel a little more like Spring for me. The kits are so pretty! Pam, the owner, always does a superb job of putting the kits together. They all coordinate so well!

April 2018 Main Kit Sneak Peeks

April 2018 Creative Kit Sneak Peeks

April 2018 Limited Edition Sneak Peeks

April 2018 Album Kit Sneak Peeks
It's only two more days to wait until the big design team reveal so be sure and check back and reserve your kits today.

Have a crafty day!

Monday, April 2, 2018

Multicraft Challenge

Hello scrappy friends!

Recently, I was invited by Creative Scrapbooker Magazine to participate in the Multicraft  Challenge.

If you aren't familiar with Multicraft, they are a Canadian based craft supply company that has affordable, good quality craft products. In fact, I recently saw some of their products in my local Walmart as well.

Three scrapbookers were invited to take part in the challenge and given exactly the same products to create a layout, card or whatever suits their fancy. It is always intriguing to me to see how each person has a unique take on these types of challenges. No two people come up with the same creation.

I was immediately drawn to the gorgeous papers in the kit and knew that I wanted to create a dreamcatcher.


Here are some instructions on how I created this layout as follows:

  1. I began my page by taking a 12 X 12 piece of white textured card stock. 
  2. The purple ink that I used is by the Multicraft Forever In Time Collection. I "stamped" the ink pad onto my craft mat and used a water brush to add some water and mixed the ink and water together and using the packaging technique, I stamped the paper. 
  3. I wanted a little more texture so I added a script background stamp, that was in my stash, and pressed the Multicraft purple ink pad onto it and stamped around my page until I was happy with the look. I felt that it still needed something so I added some splatters of Heidi Swapp Color shine in Gold Lame. 
  4. Once it was all dry, I took the fabulous Multicraft gold pen and colored the Multicraft chipboard flourishes with gold and let them dry. 
  5. Now it was time to assemble my page. 
  6. The white feathers with the gold dipped tips are so gorgeous that Multicraft has and I knew that they would be perfect for assembling my dreamcatcher.  I fussy cut some feathers from the beautiful papers and arranged then on top of the white with gold dipped feathers and adhered them to the card stock. 
  7. I added a patterned paper strip near the top of my page. 
  8. The die cut circle above the feathers is a cut file from Just Nick that I cut out on white card stock with my Silhouette Cameo electronic cutting machine and colored it with the gold Multicraft pen.
  9. Once it was dry, I backed it with some patterned paper from the Multicraft patterned papers and adhered it to the chipboard flourishes and feathers. 
  10. My photo was matted onto some of the pretty Multicraft handmade pastel papers and added a tag and scraps of patterned paper behind the photo to give it more layers.
  11. I added a gold line near the outside edge of my white cardstock background with the gold pen and a ruler and also the pink paper that mats my photo. 
  12. Finally, I hand journaled the date on the bottom right hand corner of the white card stock background.  
  13. My title was created with some pretty sparkly aqua American Craft alphabet "Thickers" from my stash.
The layout is now complete.


Supplies On This Layout


Adhesive Foam Dots - Multicraft Forever In Time Collection
Alphabet Stickers - American Crafts
Card stock - White Textured - American Crafts
Chipboard - Fab Scraps
Digital Cut File - Just Nick Digital Cut Files
Electronic Cutting Machine - Silhouette Cameo - Silhouette America 
Handmade Papers - Multicraft Forever In Time Collection
Ink - Purple Ink Pad - Multicraft Forever In Time Collection
Feathers - White/Gold Dipped - Multicraft Forever In Time Collection
Mist - Heidi Swapp Color Shine - Gold Lame
Patterned Papers - (Dreamcatcher)  Multicraft - Forever In Time Collection 
Stamp - Script Stamp - Recollections (Michael's)


I hope you enjoyed my tutorial and layout and are inspired. 

Have a wonderful day and happy creating!