Thursday, January 28, 2016

Scrapping Our Stash January 2016 Blog Hop


Hello friends! So glad you could join me and some of my scrappy friends for the monthly Scrapping Our Stash Blog Hop.  Below is a list and links to all the ladies participating in the hop. Be sure and visit everyone on the list.  Some will be offering giveaways.  Happy hopping!
For this blog hop we are using our stash of scrapbooking products that came out before the last CHA (Craft And Hobby Association Trade Show).  I thought I would use some of my Bella Blvd. stash of papers (Lucky Starz Collection) and several Bella Blvd. embellishments as well as some flair buttons from A Flair For Buttons.  

 My son Clayton was two years old when we adopted our cat Asia.  She was also two years old and had been in a no kill shelter.
The poor kitty had been in a cage for 5 months and our family chose her to come home with us.  Clayton and Asia had a special bond since Clayton's siblings were grown up and married it was like his little sister.


Thanks for hopping by! Now it's on to Alison's blog.  I'm sure she has an awesome project to share.


Just Read Layout

Hello friends! Today I am sharing somewhat of a mixed media layout over at A Flair For Buttons.

Every once in a while I like to mix it up and play with my inks, sprays, and stamps.  I adore this photo of my son when he was reading out loud to his nana.  It was a special moment for him.  This is when he was 6 years old and now he is 16.

AFFBJanuary28

IMG_0642

IMG_0645

I used two flair buttons on this layout.  I try to think outside the box and use different flair buttons than what they are really intended for.
Il_570xN.716776247_pj7q
 Il_570xN.335130072 
Be sure and check out all the flair at A Flair For Buttons.  There are hundreds of flair buttons and sets to choose from.

Have a creative day!

Supplies Used On This Layout:

Alpha Stickers - Simple Stories
Brad - Echo Park
Cardstock - American Crafts
Circle Punch - Marvy Uchida
Distress Inks - Ranger 
Enamel Dots - My Mind's Eye
Metal Heart Clip - American Crafts
Patterned Paper - Bo Bunny
Sewing Thread - Coates
Stamps - Creative Embellishments
Twine - Doodlebug Designs 
Wood Veneers - Studio Calico

Monday, January 25, 2016

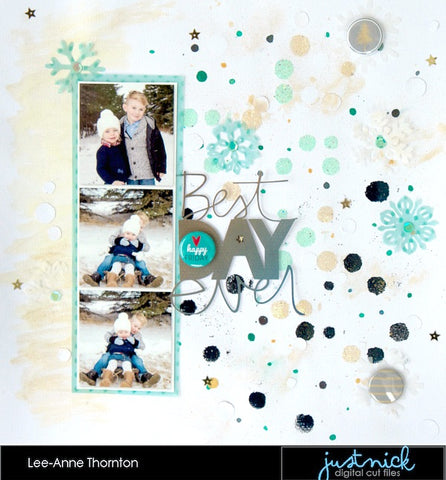
Best Day Ever And Let It Snow Layouts

Hello friends! It's Lee-Anne here and today I am sharing two layouts using three Just Nick cut files.  I also wanted to show you how to use the Little Black Dots Background Cut File as a "stencil" in two different techniques.
For the first layout, I cut out the Little Black Dots Background Cut File with my Silhouette Cameo on a 12 X 12 sheet of white card stock.  I used the negative space and dabbed the inside of the circles with an embossing dauber and then added some embossing powder in aqua, navy, and gold and heat set it with my heat gun until they were dry.  I added some of the positive circles from the cut file of the white card stock and adhered them to the background to give more texture and dimension.  I thought it made it look like snow.  I also cut out some snowflakes from the Snowflakes cut file in white vellum and aqua dot vellum, adhered them to the background and added some sequins or flair buttons to the center of the snowflakes.  I also cut out my title, the Best Day Ever cut file and added a flair button to the center of the letter D and a sequin to the center of the letter "A".  
I really had fun with this layout.  
For the second layout, I cut the Little Black Dots Background on another sheet of white card stock and used it as a stencil with some modelling paste.  Once the modelling paste was dry, I spritzed it with some Heidi Swapp Gold Colorshine Mist. I wanted to achieve the look of snow and give the layout some dimension.  Then I added my photos and patterned papers on top and cut out some vellum snowflakes on my Cameo with the Snowflake cut file on white vellum and aqua dotted vellum and added a sequin to the center of them.
 

Cut files make great stencils for mixed media projects.  I hope I inspired you to use your cut files in a different way.
Thanks for stopping by and be sure to check out these and many more cut files in the Just Nick Store.  
Cut Files Used:

Friday, January 22, 2016

Bloom

Hello friends! Happy Friday! Today I am sharing a mixed media layout over at A Flair For Buttons using a flair button from the In The Garden flair set.

I love Daylilies and I love to garden and I thought this flair button was perfect for this layout.


To create this layout, I used two different cut files from Just Nick, my Silhouette Cameo, white card stock, black card stock, Heidi Swapp Colorshine Mists, Bella Blvd. Enamel Dots and Doodads, some papers and stickers from the Bella Blvd. Color Chaos Collection, sequins, my sewing machine to stitch around the outside edge, and a small circle paper punch.  I also used dimensional squares to give the flower cut file some dimension.

Here are some closeups:


Earlier this week, I blogged a tutorial on how I use the "cellophane stamping technique" on my layouts.   I also used it for this layout.  Please find the blog post here.

Be sure to check out all the flair buttons in the A Flair For Buttons shop, and also Just Nick Digital Cut Files for amazing cut files that you can cut out on your electronic die cutting machines.

Have a lovely day!

Flair Button Used On This Layout


Tuesday, January 19, 2016

My Creative Scrapbook Tutorial - Create A Background With An Acid Free Pen, Mist, And Stencil

Hello friends!  Today I am on the My Creative Scrapbook blog sharing a quick tutorial on how to use an acid free pen, a stencil, and spray mist to add color and detail to a white background.


You will need:

Supplies:


An acid free black pen, 
A small piece of cellophane (I used the packaging from the stencil and cut it in half)
A Stencil
A spray mat or something to place your project on to project your work surface such as a large piece of poster board or kraft paper. 

Instructions:

Place the stencil on the 12 X 12 piece of white card stock as shown on my layout.  I placed it on the bottom left corner and top right corner.
  
Take the acid free black pen and trace it around the shape of the stencil. 


When the ink is dry, spray some spray mist on a paper plate or craft mat


With the cellophane, crumple it in your hand into a ball and place the cellophane in the pool of spray mist.  The cellophane is difficult to photograph as it is transparent.


Stamp the cellophane that is loaded with mist onto the traced stencil design as I have done below. Let dry.


Take the spray mist bottle and CAREFULLY unscrew the cap and use the spray tube to splatter additional mist droplets onto the white card stock.


I really like the effect that the stencil and the cellophane "stamp" creates.  Once the mist is dry,  it's time to design your layout.  Have fun!
    I hope you enjoyed this little technique on how to use a stencil and mist in a creative way on all your paper crafting projects.
    -------------------- 

    Here's the My Creative Scrapbook January 2016 Main Kit: 


    For full descriptions of all the kits, subscription information, the Designer Gallery and more, visit the website at My Creative Scrapbook

    Monday, January 18, 2016

    Design Team Member At Paper House Productions


    Hello friends! Happy Monday! Usually I don't get excited about Mondays, but today is starting off with a bang.  I just received word that I made the 2016 Paper House Productions Design Team!

    I can't believe it.  Here is the new design team announcement.

    I am very honored to have this opportunity.  Looking forward to designing for this awesome company in 2016.

    Thanks for stopping by so I could share some happy news.


    Thursday, January 14, 2016

    Sunshine & Happiness Layout

    Hello followers! Today I am on the A Flair For Buttons blog sharing a layout of my eldest son and daughter in law on one of their many vacations to the Dominican Republic.  They have done lots of travelling in their seven years of marriage and I love to live vicariously through them.  Ha!

    I added lots of flair buttons to this vacation layout.  Actually four flair buttons in total from three different flair sets.

    The "#travel" flair button is from the Hashtag Summer Flair Set,  the "Hola" flair button is from the Mexico Flair Set, the "relax" and "at the beach" flair buttons are from the Relax Flair Set.  I love mixing and matching sets.

    I love the softness of vellum and I thought I would use a circle punch to add some vellum circles underneath some of the flair buttons  I think it makes it stand out more from the bright background.  


    For the patterned papers, I used the Jet Set Collection by We R Memory Keepers.  The cut files I used for this layout are from Just Nick Digital Cut Files that I cut with my Silhouette Cameo cutting machine.  The sketch I used for this layout was designed by Kelly Klapstein for Creative Scrapbooker Magazine's January Sketchy Challenge.

    Thanks for stopping by and be sure to stop by and check out all the amazing flair in the shop at A Flair For Buttons.

    Flair Sets Used On This Layout

    Hashtag Summer Flair Set
    Mexico Flair Set
    Relax Flair Set