Friday, December 23, 2011

Winter Paper Cone Wreath

Winter Paper Cone Wreath
I was totally inspired by a paper wreath that Greta Hammond created on the Little Yellow Bicycle blog that I had to make one to hang in my home for the entire winter. You can find it here:
http://littleyellowbicycle.typepad.com/my-blog/2011/12/a-chilly-day-on-the-blog-with-new-winter-twig-and-the-biker-chicks.html.

Blue is my favorite color and I just love Little Yellow Bicycle's new Winter Twig collection.  The colors are gorgeous.  I used many of the collection's patterned paper, and added some ribbon, a snowman sticker, letter stickers and a plastic star ornament to complete the centre of the wreath.  It was a little tricky making the paper cones at first, but once I learned it was fine.  I googled paper cone wreath and found this tutorial at:  http://www.youtube.com/watch?v=EcV9QIZy6kU

Have a wonderful day!

Twisted Sketches Layout #133

I have so enjoyed being on the Twisted Sketches Layout Team for the last six months.  The twist on this sketch was "jewel".  I never find it difficult to put a little bling on my layouts.  This layout was created with the new Fancy Pants "Wonderland" collection.  I love the soft colors in this collection and had the perfect photo to scrap with it.


You can find the sketch here.  Come follow along with us and take a break from the craziness of Christmas.

Wednesday, December 14, 2011

Ribbon Tree

Here is a great way to use ribbon from your stash.  A ribbon tree!  I made this one last night using a 12 inch styrofoam cone tree, four different types of ribbon, a poinsettia flower pick, a ruler, scissors and a hot glue gun.


Measure and cut 4 inch pieces of ribbon.  I used 5/8 inches wide ribbon in silver and blue and 1/2 inch wide ribbon in pink.

Starting at the bottom of your styrofoam cone, fold ribbon in half and either use a pin or a dab of hot glue on each piece.  Go around the tree and hot glue pieces onto styrofoam.  Keep adding ribbon until you reach the top of the tree.

Take your poinsettia pick and stick it into the top of the styrofoam tree.

It is a little time consuming, but worth it in the end.

I like using non-traditional colors for Christmas decorating.  I think I will give my Mom this one for her front entrance as she has the perfect table to display it on.

Have an awesome day!

Tuesday, December 13, 2011

Loopy Winter Wreath

I am on a wreath kick these days and I wanted to use up some scraps of paper so a loopy wreath was the way to do this.

Echo Park is one of my favorite scrapbooking paper manufacturers and I had some scraps left over from last year from their "Wintertime" collection and this year they have a winter collection named "Winter Park". It was easy to combine these two collections as the colors are very similar.


Our Canadian winters are long so it is a good way to decorate the home for the winter season.

Have a great day!

Monday, December 12, 2011

Puppy Love

My daughter and her husband have a dog named Elly.  Here is a layout of her when she was a puppy:


This layout was done with Fancy Pants "It's The Little Things" collection.  First I distressed the edges and cut a frame from the paper.  I made the rosettes from a Tim Holtz Rosette die, the sheer flower was one of my own creations using a Bounce fabric softener sheet, Stickles and a Prima jewel.  The vintage buttons are from Jenni Bowlin and the pearls from Kaisercraft.  I painted the Maya Road Chipboard Letters with a Ranger Paint Dabber in the color "Pool" and rolled a text roller stamp on top of the painted chipboard letters.  Lastly, I wanted to give it some texture so I adhered some lacy ribbon, painted a little area and used some rubons from the same Fancy Pants collection.  Thanks for checking out my blog and have a wonderful day!

Saturday, December 10, 2011

Rolled Paper Christmas Tree Canvas

Rolled Paper Christmas Tree Canvas
This was super fun to create.   One of my favorite collections of Christmas papers is the Fancy Pants Hot Chocolate Collection.  I rolled the papers and hot glued them onto a 8X10 canvas.  The tree is  embellished with buttons and brads and I added a snow flake sticker to the top of the tree and adhered a jewel to the center of the snowflake.  The sky is created from Pan Pastels and also I cut a pom pom ribbon apart and hot glued some snowballs onto the canvas.  The snow on the bottom of the canvas was created by using a Versamark pad and some crystal embossing power of which I heat embossed.  Finally I added a small piece of ribbon to the bottom of the tree to give it more texture and cut a trunk out of paper.  Hope you have a great weekend and have some time to get crafty for Christmas!

Wednesday, December 7, 2011

Twisted Sketches #131

My layout design #131 for Twisted Sketches is posted here today.  You will find the sketch here at www.twistedsketches.org.  Come play along with myself and the other Twisted Sisters.

Christmas Gifts

This year I am making a lot of my Christmas gifts.  I made this with a dollar store frame and some scrapbook papers from Fancy Pants Hot Chocolate collection.


I used some small white fuzzy snowballs from Little Yellow Bicycle and stamped and embossed some snowflakes on the background and the snowman.  I adhered some clear glass crystals to the tree and the "winter" sticker.  It was so fun to do and it really took me only about 30 minutes to complete.

Hope you have a wonderful day!

Saturday, December 3, 2011

Wreaths

I love wreaths and I love Pinterest.  Here are two wreaths that I created that I pinned on Pinterest.  The first one was created with the new Echo Park Winter Park Collection.  I love the blues and burgundy together.  I used my Slice to cut out the stars.  They measure 4 inches.  I used my Scor-Pal Scoring Board to score the stars to give them more dimension.  I used my hot glue gun and adhered all the stars onto a flat wood wreath that I bought in the floral department at Michaels.  I put a button on each star and tied some ribbon behind the wreath to hang.


You can find the tutorial at:   http://littlebirdiesecrets.blogspot.com/2010/12/last-mintue-christmas-decorations-3d.html

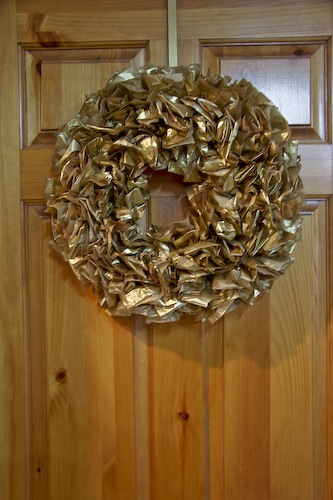
The other wreath I made today is made out of gold tissue paper that I bought at the dollar store.  I bought the 12" styrofoam wreath form at Michaels and used my hot glue gun to glue the tissue paper onto the wreath.   This was a labour of love but I think the final product was worth it.


You can find the tutorial for this at:  http://www.ablissfulnest.com/2010/03/tissue-paper-wreath-how-to.html

I hope this inspires you to make a wreath.  They are nice anytime of the year!

Wednesday, November 30, 2011

Creating Texture With Household Items

Here is a great video on creating texture on your scrapbook pages, art journals and mixed media projects. I love her practical approach to art!  Christy rocks!

  http://myemail.constantcontact.com/New-Behind-the-Art-Video---creating-texture-with-the-everyday--.html?soid=1102045935010&aid=_F2bOG_WG_Q

I tried to find a pair of flip flops at the dollar store, but they were all out since it is our winter right now. I know I have some shoes in the garage that have great texture so I'll see you later.....

Monday, November 28, 2011

Oh Christmas Tree, O Christmas Tree...

Today I made this Christmas tree for my coffee table.  It's just the perfect size.


I was inspired by Liz Qualman's tree on the Little Yellow Bicycle Blog.  It came together pretty quickly with the Scor-Pal scoring board.  The tricky part was gluing it all together.  I used Little Yellow Bicycle's Wonder and Wishes patterned papers, and garland, which I added bling to every circle and I punched out a flower from the Dahlia Punch by EK Success.  I then added pearls to the flower and placed it on a little plastic jar.  It was fun!  Have a great day!

Friday, November 25, 2011

My New Kitchen Aid Stand Mixer!


Kitchen Aid Artisan Stand Mixers


Besides scrapbooking, I love baking.  It is so relaxing.  Christmas is just around the corner and my husband bought me something that I have wanted for years.  A new Kitchen Aid Artisan Stand Mixer!  It's going to be great!  I got the mixer in Green Apple.  Today I am going to make some chocolate chip cookies and try it out. 


Thursday, November 24, 2011

Twisted Sketches Layout #129

I created this layout for the Twisted Sketches Layout Design Team.


The twist on the sketch was ribbon.  I made a flower from ribbon and pleated a ribbon on the layout.  I used Lime Twist patterned papers by My Minds Eye and corrugated letters by Jillibean Soup.  I then painted the letters.  The paint splats I created with paint dabber and water.

You can find the sketch here.

Come have some fun with us and create your own layout from this sketch.

I also want to thank my American friends a very happy Thanksgiving.  As a Canadian, I celebrated Thanksgiving in October with a turkey, all the trimmings and a pumpkin pie.

Have a wonderful day!

Sunday, November 20, 2011

Some Layouts

There are some challenges going on for Sketchy Saturdays at Wescrap.

Here is my layout for the November 12 challenge:


and the layout for the November 19 Sketchy Saturday Challenge:


Nothing gets my creative juices flowing like a sketch.  Have a wonderful Sunday!

Saturday, November 19, 2011

She Art Workshop 2

Christy Tomlinson's She Art Workshop 2 began online this week and this talented lady inspires me so much!  If you haven't taken  any classes with her, DO IT NOW!  You will surprise the heck out of yourself.

Here is my first girl with a face.  It's going to take a bit more practice, but I am happy with the first attempt.


Christmas Tree Canvas Tutorial

I am a huge fan of Christy Tomlinson.  She has some wonderful online workshops to inspire and explore our inner artist. Christmas is around the corner and she has a great tutorial on making a Christmas Tree Canvas.  You can find the tutorial here:


 http://christytomlinson.typepad.com/files/christytomlinson_decmixedmediaart2.pdf

I love that you can use a lot of scrapbook supplies to make this such as paint, rubons, patterned paper, glitter and embellishments such as buttons.  She recommends using Matte Mod Podge, but I have recently found Decoupage, made by Deco Art, works even better.  I buy it at Michaels and it comes in matte or glossy finish.  I prefer the matte finish.

 
I plan on making lots of little projects for Christmas with Decoupage.  Have a wonderful day!

Wednesday, November 16, 2011

Flowers Made From Bounce Sheets

Here is a simple, fun idea to make flowers for all your projects while you upcycle at the same time!  You will need:

  • A Bounce Fabric Softener Sheet that has already been used in the dryer
  • A pair of scissors
  • Tattered Angels Glimmer Mist (your choice of color)
  • Ranger Stickles (your choice of color)
  • Adhesive (glue dots, Mono Adhesive or Fabri-Tac)
  • A button, brad, jewels, pearls or a pebble for the center of flower

Let's begin:

Cut 3 circles from the used Bounce Fabric Softener Sheet.  I usually cut one circle 2-1/2 inches, one circle 1-1/2 inches, and one circle 1 inch.  They don't have to be perfect as it looks better if they aren't.


Place the three circles on a craft mat, or inside of a box, and spray with Tattered Angels Glimmer Mist until thoroughly saturated.


 Let dry naturally or with a heat tool to speed up the drying process.

Once misted circles are dry, take your bottle of Stickles and apply around the outer edge of each misted circle.


Let these dry naturally because a heat tool doesn't dry Stickles.

Once the misted circles are completely dry and the Stickles around the outer edges are dry, apply a dab of glue in the middle of the 1 inch and 1 1/2 inch circle and layer your circles.


Place a brad, button, jewel or pebble on the top center of the flower.


Voila!  You now have a flower to embellish your favorite project!

Monday, November 14, 2011

Some Layouts From A Prize I Won

There was recently a blog hop on the Wescrap forum that I participate in regularly.  I received their November kit "Recess" and made these two layouts with the kit.


Right now they are looking for four new design team members to join their team.  If you are interested, check out www.wescrap.com.

Have a scrap happy day!

Thursday, November 10, 2011

Twisted Sketches Layout #127

Twisted Sketches Layout #127 is posted now.  For my layout this week the twist was chipboard. This layout is of my son's 12th birthday that he celebrated almost two weeks ago.  I used chipboard a lot on this layout.  The banner, the heart and the little swirlydoo on the top of the photo is all chipboard that I painted and stamped.


You can find the sketch here:

Hope you can play along with us.  Have fun and have a wonderful day!

crop-a-ganza!: Registration Open!!

crop-a-ganza!: Registration Open!!: We can't think of a better way to spend a weekend in the cold of February... then to hang out with some amazing scrapbooking friends and som...

Thursday, October 27, 2011

Twisted Sketches Layout #125

Today is the day Twisted Sketches reveals layout #125.  The twist was black.  I created a layout of my oldest son Brandon.  He was married three years ago and in this photo he was waiting in a room at the back of the church for the ceremony to begin.  I was so proud of him.  I don't have many photos of Brandon and I so this one is special to me.  Here is the layout I created:

            
I used black vintage buttons from Jenni Bowlin and flowers and crystals from Prima and the paper is from Bo Bunny's Timeless Collection.

It would be great if you followed along and created a layout with the sketch here.   Anam Stubbington designs the sketches and she does such a great job.

Have a great day!


Monday, October 24, 2011

Color

I love color.  It sets a mood and art wouldn't be art without color.

I like to challenge myself with color.  I took this color pallette:


and made this:


I am normally a scrapbooker, but I am trying to explore new things so I am learning Mixed Media.

These colors are quite bright together, but I think I was able to pull off this challenge.

Sometimes it's good to get out of my comfort zone.

Hope you have a wonderful day and I have inspired you to be creative with color!

Tuesday, October 18, 2011

My Northern Lights She Art Girl

Lately, I am very inspired by the colors of the sky.  As I worked on this girl, it made me remember living in Northern Alberta and seeing the beautiful Northern Lights often.  I wanted to try to create a girl with the Northern Lights.


She was a lot of fun to do.  I wanted to add a bit more texture by adding a lacy belt and some sparkle.

So much fun!  I can't wait to start the She Art Workshop 2 in November!  But for now, I will explore the mixed media world, which is quite new to me.

Sunday, October 16, 2011

Another She Art Girl

For the past few months I have been scrapbooking, but sometimes get in a rut so I try something different.   A few months ago I signed up for Christy Tomlinson's She Art Workshop.  It is a mixed media class that she teaches online.  I was hooked after making my first girl.  Today I thought I would create another girl.  
This is my fifth girl and I think she turned out well.   I have now signed up for her She Art Workshop 2 online class which starts in November.


These girls are so much fun!!!  I like adding a tiny bit of dimension by adding some pearls for a necklace and a little resin rose in her hair.


I like the fact that I can use patterned paper, stamps, paint, and rubons from my scrapbooking stash.  If you haven't tried these, you will surprise yourself.  You can find Christy's She Art Workshop here.

The colour palette for this girl was inspired by a sunrise that I woke up to one morning this week.  It was like the sky was on fire and I had to grab my camera and capture this:


This photo was straight out of the camera with no tweaking.  I do believe in making every day count and trying to take time to see the beauty in everyday things.

Have a wonderful week!

Saturday, October 15, 2011

The Colour Suite Challenge

I am working on an art journal at the moment and it's so much fun to get words out onto paper and get inky and messy with paint and other mediums.

Scrapbook and Cards Today Magazine has a monthly challenge.  It's The Colour Suite Challenge.  They give a palette of colours and it challenges me to get creative with the colours.  I thought I would try it as I love all the colors.  It almost looks like halloween colours.  My page reads Be Bold...Live Out Loud.  

You can find the link here:  Why don't you play along?

Wednesday, October 12, 2011

Twisted Sketches Layout #123


I love being on the Twisted Sketches Design Team.  It is so cool to see how everyone comes up with a unique creation!  It keeps my creativity flowing too.  I loved this sketch as the twist was envelopes.  I made my own envelope from black and white polka dot paper.  Since we just celebrated Thanksgiving here in Canada last weekend, I thought this layout was appropriate.  It is a layout on my youngest son who will be twelve years old this month.  My other children are 26 and 24 and he is the one that is going to keep me young.  Why don't you join the Twisted Sisters on Twisted Sketches and create your own unique layout?  You can find the sketch at www.twistedsketches.org.

Have fun!

Tuesday, October 11, 2011

Loving My Pan Pastels

 Last week I went to an art supply store and bought some Pan Pastels and are they ever a lot of fun!  Christy Tomlinson teaches an art journaling class and suggests these little pans of goodness.  They are awesome!  Pan Pastels can be used both wet or dry and they are wonderful.  Here is a little tutorial I found on how to use them with card makers and scrapbookers in mind.  I can't wait to collect them in every color because I can see using these often.


Scrap Time - Ep. 536 - Pan Pastels from Mark Giles on Vimeo.

Wednesday, September 28, 2011

Twisted Sketches Layout #121


Today is the reveal of the Twisted Sketches Layout #121 on the Twisted Sketches blog.   Why don't you play along with us?  You can find the sketch here.

I loved doing this layout as I used Teresa Collins On The Edge Collection papers, brads and trims and also Maya Road Chipboard Letters, Corrugated Shapes and Tattered Angels Glimmer Mists.  The border punch is actually the Dahlia shaped flower punch by EK Success.

Saturday, September 17, 2011

Coffee Filters and Dryer Sheets?


Yes, that's right.  In this layout I had some fun with coffee filters and used fabric softener dryer sheets.  They make great embellishments for layouts and the nice thing is that you can customize them to whatever color you want for your layouts.  Don't forget to spray them with archival mists afterwards!

On this layout of my daughter and her husband on their wedding day, I made the ruffles and the tiny rosebuds from coffee filters sprayed with Tattered Angels Chalkboard Glimmer Mist in Polka Dot Pink and the larger pink flowers were made out of used fabric softener sheets, sprayed with Polka Dot Pink Glimmer Mist and outlined with Pink Stickles.  All other embellishments are Prima.

This layout was so much fun to create.  So go ahead and have fun experimenting with everyday items.  Have a scrap happy day!

Wednesday, September 14, 2011

Twisted Sketches Layout #119

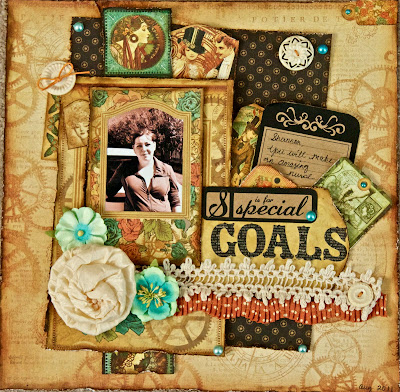
I love designing layouts from Anam Stubbington's sketches.  Here is one I created of my daughter Shannon with Graphic 45's Steampunk Debutante collection.


Come play along with the sketches.  You will find the sketches here.

Have a great day!

Friday, September 9, 2011

Flower Punches

Have you seen the new dimensional flower punches that are making their way into the papercraft stores?  I absolutely love the new punches by EK Success.  I bought the Dahlia shaped one yesterday and thought I would try it on a beachy layout.  I thought it could double as the sun.


I used 12X12 sheets of cardstock and punch a strip of both orange and yellow cardstock to make this one.  So fun!  I can't wait to try the other three punches too.  Oh the crafting possibilities!  Check out this video:


The entire layout was made from the Echo Park Splash collection.  Have a great day and thanks for popping  by!

Monday, September 5, 2011

Twelve Years Ago I Married My Best Friend...

Twelve years ago I married my best friend.  He means the world to me and he has shown me what true happiness is.

Lee-Anne and Rick - September 5, 1999

I look forward to many more wonderful years with my bestie.

To celebrate our twelve years together, I made a layout of our wedding day:


I know it is quite girly, but I wanted to portray a garden layout with all the flowers and butterflies.  I wanted the layout to have lots of dimension:


Now I will have to decide how to frame it and where to display it in our home.

Have a wonderful day!