Wednesday, November 27, 2013

Scrap Our Stash Challenge #9, November 15 Sketch

Hello friends!  Today at Scrap Our Stash it is my reveal for this sketch by Laura Whitaker.  For this sketch, Scrap Our Stash is partnering with Stuck?! Sketches and I just happen to be on both these design teams so you may have seen this same sketch and same layout a few days ago on my blog.  The cool thing about this sketch is that there are prizes on both Scrap Our Stash and Stuck?! Sketches so it's double the fun!  The challenge is to use this sketch and also include some type of wood on your layout such as veneers, stamps, paper, etc. 


For the sketch I created this layout

Being A Kid
Diecut Title & Border - Silhouette America
Kraft Cardstock - Recollections
Kraft Doily - Maya Road
Letter Stickers - Simple Stories
Mists - Heidi Swapp, Ranger
Patterned Paper - Simple Stories (Say Cheese)
Roller Stamp - Glitz Design
Stamp Ink - Ranger
Twine - My Mind's Eye
Wood Veneers - Studio Calico
Photos Courtesy of Rockwood Photography

Here are some more closeups of the layout.   


So now is your chance to play along for not one but two prizes.  To be eligible for the prizes, your entry must be uploaded before November 29 at Scrap Our Stash and Stuck?! Sketches.

Thanks for stopping by!  Have fun creating!

Tuesday, November 26, 2013

Winner Of The Christmas Love Campaign

Happy Tuesday!  I am happy to share that I have a winner for the Christmas Love Campaign that took place for the first few weeks of November over at Susan K. Weckesser.  The winner is JP Scraps!  JP Scraps, congratulations!  Please email me at scrapnut@shaw.ca with your name and mailing address.  Thank you!


True Random Number Service

Do you own an iOS or Android device? Check out our new app!

List Randomizer

There were 3 items in your list. Here they are in random order:
  1. JP Scraps
  2. Barbara Macaskill
  3. Rebecca Daly
Timestamp: 2013-11-26 04:11:57 UTC


Monday, November 25, 2013

Canadian Scrapbooker Magazine Winter 2013/2014 Publications

Hello friends!  Today I wanted to share some of my new publications.  I am so honored to have two layouts published in the Winter 2013/2014 issue of Canadian Scrapbooker Magazine!

I had the honor of one of my layouts receiving "alternate take on the front cover" of the winter issue on page 8.  The winter issue goes on sale across Canada December 1 at new stands everywhere.

55 Years Of Christmases And Counting

I also love taking photos of flowers and winter landscapes.  The following layout was also published in the Seasonal Gallery on Page 117 of the winter issue.  I used Sketch #280 from Scrapbook Challenges.

Brr
It was an amazing year this year as I was published in all four magazines of Canadian Scrapbooker Magazine and had two layouts featured as "alternate takes on the front cover".  All I can say is thank you to Canadian Scrapbooker Magazine for choosing my creations.  I truly love everything about this magazine.

Canadian Scrapbooker Magazine is published four times a year and they are always looking for Canadian submissions so don't be shy, submit!  If you would like to subscribe to this printed magazine,   the link is here.  They also have a digital version and welcome international subscribers too.  It's one of the few printed scrapbooking magazines still out there.

Thanks so much for letting me share my happy news.  I hope you have a wonderful day!


Sunday, November 24, 2013

Doily Note Card


Hello scrappy friends!  Today I am sharing with you a notecard that I created with the Kreaxions 4 In 1 Punch #309, the Kreaxions Circle Cutter and the Kreaxions Star Template.

Left To Right:  Kreaxions 4 In 1 Punch With Insert A, Kreaxions Circle Cutter and Kreaxions Star Template
Doily Note Card by Lee-Anne Thornton
Black Glitter Cardstock - Core'dinations
Kraft Cardstock Card - Michael's
White Cardstock - American Crafts
Ribbon - May Arts
Rubber Stamp - Inkadinkado by E.K. Success
Sequins - Darice
Stamp Ink - Craft Smart
Circle Cutter - Kreaxions
Star Template - Kreaxions
Paper Punch - Kreaxions 4 In 1 Punch #309


  1. First I stamped my kraft card stock card with white pigment ink and a polka dot stamp. 
  2. Next, I used the Star Template to trace out my doily on white card stock and punched all  the way around with the Kreaxions Punch #309 with the Insert A. 
  3.  I trimmed off the loose edges and then used my Kreaxions Circle Punch to cut a 3 1/2 inch circle of black glitter card stock and mounted the white doily over the black card stock circle.
  4. I then tied a silver bow and adhered a red sequin to the center of the bow and then   added silver sequins around the doily and also cut out a border of white card stock and again mounted it over the glitter card stock and trimmed it and adhered it behind the doily.
I hope that you enjoyed your visit and are inspired to try a card.  
The Kreaxions 4 In 1 Punches, Circle Cutter, and Star Template can all be purchased in the Just Imagine Crafts online store here.

Thanks for stopping by!

Let It Snow Chalkboard Christmas Card


Hello and happy Sunday!  Today I am sharing a Christmas card that I created for the Susan K. Weckesser's Design Team.  It was so much fun to create and I wanted to try to do something a little different by creating a "chalkboard" feel to my card.  I am loving the chalkboard and sequin craze right now and also vellum as it gives a little softness to a card.

Let It Snow Chalkboard Card by Lee-Anne Thornton

Kraft Cardstock Card - Michael's
Pearlized Ink - Clearsnap (Smooch Snickerdoodle)
Ribbon - May Arts
Rubber Stamps - Hero Arts, Susan K. Weckesser (IB-SB-326)
Sequins - Unknown
Stamp Ink - Craft Smart (White)
Vellum - Recollections
Washi Tape - Bella Blvd. (Jailbird)
Wood Veneer Shapes - Studio Calico


Below are the step by step instructions to create this card:

Stamp the front of the card with three different snowflake wood mounted stamps using some white    pigment ink and let it dry.

Diecut a  small envelope from a sheet of vellum (I used my Silhouette Cameo)  and cut a piece of black card stock to measure approximately 3.5 inches by 2.5 inches.   Assemble and adhere the envelope.

Stamp the Susan K. Weckesser snowman stamp (IB-SB-326 One Of A Kind Winter) and also the "let it snow" sentiment with some white pigment ink onto a sheet of black card stock and let it dry. When it was dry,  fussy cut the snowman.

Slide the black card stock sentiment into the vellum envelope and added some gold sequins and wood veneer stars painted with some Smooch Pearlized Accent Ink.

Cut a strip of washi tape and adhere it around the bottom of the vellum envelope making sure to cut the strip long enough to seal the right hand side of the envelope.

Adhere the "chalkboard" snowman with adhesive to the righthand side of the envelope.  Be sure to offset it a little off the righthand side of the vellum envelope and adhere three wood veneer stars to the outside of the vellum envelope.  Set the vellum envelope aside.

Wrap the of gold May Arts ribbon around the front of the card and tie a bow. Make sure to have it on the lefthand side of the card so there is enough space for the vellum envelope to be placed to the righthand side of it.

Add some dimensional adhesive or pop dots to the backside of the vellum envelope and place it over the ribbon.

The card is now complete.  I hope you enjoyed this tutorial and be sure to check out Susan K. Weckesser's blog for more inspiration.  Have a creative day!


Tuesday, November 19, 2013

Win Some Ranger Goodies! The Christmas Love Campaign

After two weeks of hand made projects, we've come to the end 
of the Christmas Love Campaign designer posts but it's not over 
for the Love Campaign itself and on Susans blog at the moment
 you can read the designer chat as well as look at all the gift 
inspiration.

 You can check out Susan K WeckesserChristmas Love Campaign
 and her Design Team’s Hand-Made Christmas projects for yourself 
and maybe find some inspiration.  This was mine… 

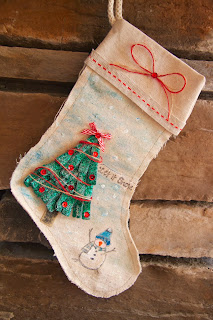
Snowman Christmas Stocking by Lee-Anne Thornton
Are you making any handmade gifts for the holidays?  If you are, I also invite you to check out Susan K Weckesser’sChristmas Love Campaign and her Design Team’s Hand-Made Christmas projects.  There are lots of prize packages being offered throughout the Holiday Season.  

And in the spirit of giving, we are offering our Fans and Friends a chance to win a prize package from Ranger Ink possibly containing such goodies as stencils, aprons, Distress Inks, pens, & ink pads.   Each bag will be different.  So, what do you have to do to win?
     
  1. Create a card or craft to randomly give someone

  2. LIKE Christmas Love Campaign Facebook page

  3. share a picture of your project – you can write a blog post and share the link or share your project picture directly to the Christmas Love Campaign Facebook wall

  4. LIKE Ranger Ink and tell them thanks for sponsoring Christmas Love Campaign

  5. Finally, come back here and let me know you did these things and where I can see your project! 
**You have until Monday night at midnight – 11/23/2013 midnight CST to share and leave me a comment.**

I am so excited to see what everyone is creating and it’s so much fun to read about all the handmade gifts being shared this year!

Sunday, November 17, 2013

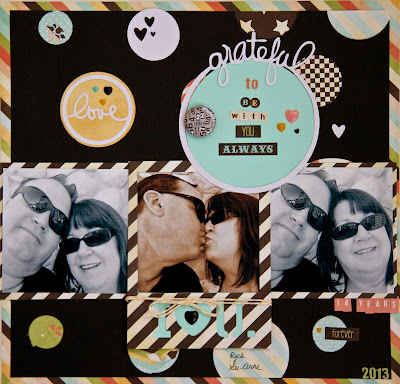
Grateful To Be With You Always Layout


Happy Sunday!  There is a blizzard in my neck of the woods so it's a perfect time to stay home and do some scrapbooking guilt free.

Today I am sharing a personal layout of my husband and I and a warning it is a bit mushy (smile).  For this layout, I used a sketch created by Sue Sykes for the Canadian Scrapbooker November Sketchy Challenge.  

I had so much fun with this layout because circles and stars are some of my favourite shapes to add to my scrapbook pages.

Grateful To Be With You Always
Cardstock - American Crafts
Circle Cutter - Kreaxions
Diecuts - Silhouette America
Flair Button - The Paper Bakery
Patterned Papers - Fancy Pants (Memories Captured Collection)
Letter Stickers - Fancy Pants (Memories Captured), Studio Calico
Pen - Marvy Uchida
Punch - Kreaxions #309
Sugardot Stickers (hearts) - Prima Marketing Inc.
Twine - My Mind's Eye


I used the Kreaxions 4 in 1 Punch #309 with Insert A to create a flower design on some of the paper circles
Kreaxions 4 In 1 Punch #309


and also the amazing Kreaxions Circle Cutter that cuts circles from one inch up to ten inches.  It's so easy to use too!

Both can be purchased in the online store here .

Thanks for stopping by and have a wonderful weekend full of fun things to do!

Friday, November 15, 2013

Being A Kid - November 15 Sketch At Stuck?! Sketches

Happy Friday!  Today at Stuck?! Sketches it is reveal day for a new sketch.  As always, Laura Whitaker has a great one.


Stuck?! Sketches is  partnering with Scrap our Stash, who are challenging us to use something wood (ie. wood veneer, wood embossing, wood patterned paper) on our layouts. participants can use both the sketch and the challenge and link up with both sites for a chance at both prizes.  

Here is my take on the sketch.  I used some Studio Calico wood veneers for this layout.


Being A Kid
Diecut Title & Border - Silhouette America
Kraft Cardstock - Recollections
Kraft Doily - Maya Road
Letter Stickers - Simple Stories
Mists - Heidi Swapp, Ranger
Patterned Paper - Simple Stories (Say Cheese)
Roller Stamp - Glitz Design
Stamp Ink - Ranger
Twine - My Mind's Eye
Wood Veneers - Studio Calico
Photos Courtesy of Rockwood Photography
Here are some more closeups of the layout.  


Don't forget to link up at Stuck?! Sketches to be eligible for a chance to win a $15 gift certificate to Whimsical Twist and also at Scrap Our Stash for a chance to win a $20 gift certificate from Paper Secrets!  The deadline for both is November 29 at midnight!  Good luck!

Thanks for stopping by and have fun!

Tuesday, November 12, 2013

Let It Snow Christmas Tree And Snowman Stocking

Happy Tuesday!  Today is my day for my Christmas Love Campaign project to be featured at Susan K. Weckesser and it's also my first project being a designer on the team so I am super excited.  For my first project, I made a Christmas stocking with a Canvas Corp. Canvas Stocking.


Recently I received lots of goodies from Susan and also the sponsors who support the Christmas Love Campaign.  You can read about it here.

I started with a blank canvas stocking and made a ribbon Christmas tree with some gorgeous green ribbon from May Arts and adhered it to a green glitter piece of card stock from Core'dinations.


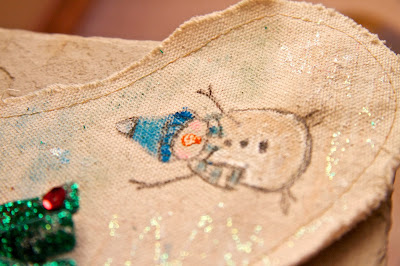
I stamped the snowman image (Susan K. Weckesser's co-branded stamp with Unity Stamps ) onto the canvas stocking and used the Scribbles Fabric Paints to colour the hat, scarf and the snowman body.  I painted the stocking with some Scribbles Blue Fabric Paint for the sky and some Scribbles White Fabric Paint for the snow.  Once the paint was dry, I used some Diamond Stickles to give the snow some added sparkle.


On the cuff of the stocking, I adhered some May Arts Ribbon around the rough edge of the cuff also added a twine bow and topped it with a red sequin for some sparkle.


For the tree, I also added twine to make it look like a garland and also adhered some red sequins to look like ornaments and used a piece of Black Magic Core'dinations Cardstock and sanded with the Sand It Gadget by Core'dinations to make it look like the tree trunk.


I hope you enjoyed your visit and are inspired to try a little craft to give to someone to make their day.  Have a creative week!

Sunday, November 10, 2013

Family Layout Using A Kreaxions 4 In 1 Punch

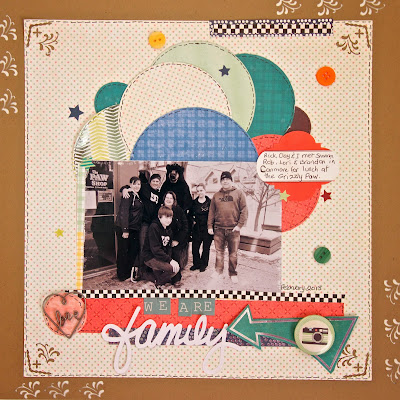
Happy Sunday!  Today I wanted to share a family layout that I created using the amazing Kreaxions Punch #310.

We Are Family
Buttons - October Afternoon
Circle Cutter - Kreaxions
Die Cut Title - Silhouette America
Flair Button - Fancy Pants Designs
Kraft Cardstock - Recollections
Letter Stickers - Authentique
Patterned Paper - SEI - Mayberry Collection
Pen - Marvy Uchida
Punch - Kreaxions Punch #310
Wire Embellishment - Maya Road
I used the Kreaxions Punch #310 with Insert A to create the design along the edges of the four corners of the kraft card stock background and Insert B to create the punched corners on the edges of the patterned paper.
Kreaxions Punch #310 with Insert A and Insert B


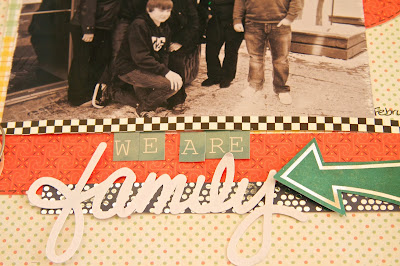
and some more closeups


I hope you enjoyed your visit.  This punch and many more can be found in the online store here.

There is also more layouts from the design team for this family layout challenge that are here. Thanks for stopping by.  Enjoy your day!