Showing posts with label Vellum. Show all posts

Saturday, July 9, 2016

Make A Splash

Hello friends. Today I am sharing this summer layout at A Flair For Buttons of my youngest son having some pool fun on a summer vacation a few years back.


I love creating layouts with circle elements and sometimes I challenge myself to use as many circle elements as I can.

I cut the beach ball die cut (from Just Nick Digital Cut Files) out on white card stock with my Silhouette Cameo and backed it with patterned papers from several Bella Blvd. Collections. I added some coordinating sequins and enamel dots.  I love the way the flair buttons finish the layout perfectly.  I also added a bow, some vellum and doilies to the top and bottom of the layout and lots of machine stitching.

I used flair from the Hello Summer Flair 


and the Summer 3 Flair


Here are a few more closeups


Il_570xN.361543585_l06u-1
Il_570xN.618053243_2ufy-1
You can find these flair buttons and hundreds more in the A Flair For Buttons shop.  
I hope you enjoyed your visit today.  Have a creative day!


Monday, February 8, 2016

Love, Love, Love, All You Need Is Love

Hello friends! Today I am on the Just Nick Digital Cut Files blog sharing a love themed layout of my oldest son and daughter in law on their trip to Europe.  These lovebirds have done a lot of travelling in their 7 years of marriage.
For the background, I began with a 12X12 piece of white card stock and used the Mini Numbers Collage  6X6 Stencil by The Crafter's Workshop and added some modelling paste and let dry.  Then I used the Cubist 6X6 Stencil, also from The Crafter's Workshop and some Worn Lipstick Ranger Distress Ink. 
I love working with vellum and I had some Doodlebug Designs embossed red heart vellum in my stash that I thought would work perfectly for this layout  and of course some Just Nick Digital Cut Files.  I cut out the HeartsInfinity Hearts Frames and Lots of Love cut files on my Silhouette Cameo.  The vellum cuts like butter on blade depth 3 on the Silhouette Cameo.  
To adhere the vellum, I machine stitched the cut designs in place so there was no adhesive showing through onto the right side.  I added some sequins, some red twine bows and a flair button from A Flair For Buttons to complete the embellishing.
I hope you are inspired to use vellum on your projects.  Check out all the designs, including the designs I used on this layout in the Just Nick shop here.
Thanks for stopping by! Happy creating!
Cut Files Used:


Monday, January 25, 2016

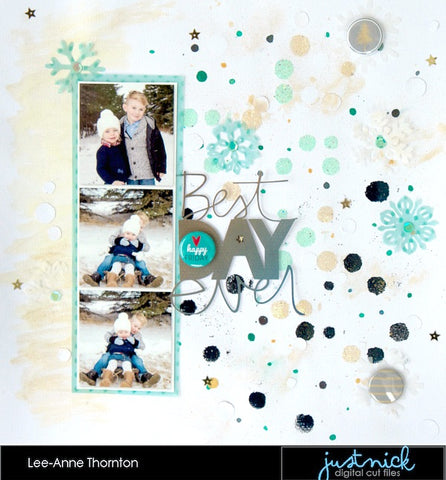
Best Day Ever And Let It Snow Layouts

Hello friends! It's Lee-Anne here and today I am sharing two layouts using three Just Nick cut files.  I also wanted to show you how to use the Little Black Dots Background Cut File as a "stencil" in two different techniques.
For the first layout, I cut out the Little Black Dots Background Cut File with my Silhouette Cameo on a 12 X 12 sheet of white card stock.  I used the negative space and dabbed the inside of the circles with an embossing dauber and then added some embossing powder in aqua, navy, and gold and heat set it with my heat gun until they were dry.  I added some of the positive circles from the cut file of the white card stock and adhered them to the background to give more texture and dimension.  I thought it made it look like snow.  I also cut out some snowflakes from the Snowflakes cut file in white vellum and aqua dot vellum, adhered them to the background and added some sequins or flair buttons to the center of the snowflakes.  I also cut out my title, the Best Day Ever cut file and added a flair button to the center of the letter D and a sequin to the center of the letter "A".  
I really had fun with this layout.  
For the second layout, I cut the Little Black Dots Background on another sheet of white card stock and used it as a stencil with some modelling paste.  Once the modelling paste was dry, I spritzed it with some Heidi Swapp Gold Colorshine Mist. I wanted to achieve the look of snow and give the layout some dimension.  Then I added my photos and patterned papers on top and cut out some vellum snowflakes on my Cameo with the Snowflake cut file on white vellum and aqua dotted vellum and added a sequin to the center of them.
 

Cut files make great stencils for mixed media projects.  I hope I inspired you to use your cut files in a different way.
Thanks for stopping by and be sure to check out these and many more cut files in the Just Nick Store.  
Cut Files Used:

Thursday, January 14, 2016

Sunshine & Happiness Layout

Hello followers! Today I am on the A Flair For Buttons blog sharing a layout of my eldest son and daughter in law on one of their many vacations to the Dominican Republic.  They have done lots of travelling in their seven years of marriage and I love to live vicariously through them.  Ha!

I added lots of flair buttons to this vacation layout.  Actually four flair buttons in total from three different flair sets.

The "#travel" flair button is from the Hashtag Summer Flair Set,  the "Hola" flair button is from the Mexico Flair Set, the "relax" and "at the beach" flair buttons are from the Relax Flair Set.  I love mixing and matching sets.

I love the softness of vellum and I thought I would use a circle punch to add some vellum circles underneath some of the flair buttons  I think it makes it stand out more from the bright background.  


For the patterned papers, I used the Jet Set Collection by We R Memory Keepers.  The cut files I used for this layout are from Just Nick Digital Cut Files that I cut with my Silhouette Cameo cutting machine.  The sketch I used for this layout was designed by Kelly Klapstein for Creative Scrapbooker Magazine's January Sketchy Challenge.

Thanks for stopping by and be sure to stop by and check out all the amazing flair in the shop at A Flair For Buttons.

Flair Sets Used On This Layout

Hashtag Summer Flair Set
Mexico Flair Set
Relax Flair Set

Saturday, December 19, 2015

A Mini Envelope Tutorial For My Creative Scrapbook

Hello friends! Today I wanted to share a quick tutorial on how to create mini envelopes.

I recently was a guest designer over at My Creative Scrapbook and was asked to create some layouts using the beautiful December Main Kit.

When I saw the vellum papers in the kit, I thought they would be great for making some miniature envelopes to add some embellishments or use as an advent calendar.


To create these envelopes you will need:

A mini envelope paper punch or a template (I used a paper punch for mine)
Scissors
Liquid glue
A bone folder
A strong adhesive.  (I used my ATG gun to adhere the back of the mini envelopes to the background paper)


 To being my project,  I punched 25 mini envelopes, some with the striped vellum and some with the dotted vellum.


I took my bone folder and scored across the the fold where the top flap would fold, one on the left hand flap, one on the right hand flap and the bottom flap.  I folded all the flaps on the fold lines toward the middle as shown below.


I added a dab of liquid glue and and secured the flaps as shown below.


I chose to keep the upper flap open so something can be tucked inside. The envelope is now complete.

On my layout,  I spaced the envelopes evenly on the background paper alternating striped envelopes and dotted envelopes adhering them to the background paper with my ATG tape runner.  As you will notice, I also added one mini envelope to the top right hand corner of the photo.


If you don't have a mini envelope paper punch, Here is a photo of the shape of the envelope when it is folded.  It measures 1.5 inches high by 1.5 inches wide.  Simply hand draw this shape and cut it out with some scissors.


I hope you enjoyed my tutorial and have fun making some mini envelopes.  Have a great day!

Saturday, December 5, 2015

December 2015 Reveal Day At My Creative Scrapbook

Hello friends! Happy Saturday! On the fifth day of each month, My Creative Scrapbook reveals all the kits for that month so today it is reveal day of the December 2015 kits.

I am honored, for the fifth consecutive month, to be a part of the reveal.  Wow! What gorgeous kits they all are! I was given the December Main Kit to create with and I was easily able to create four layouts with plenty of product left over to create even more layouts and cards.  What a good value! Here are my four layouts:


The December Main Kit is beautiful.


Not only is the December 2015 Main Kit gorgeous but look at these!


To see the entire December 2015 Kits reveal, go here to the design team gallery and be inspired!

Thanks for stopping by and be sure to order your December 2015 kits today here.

Sunday, March 1, 2015

Stuck?! Sketches March 1, 2015 Sketch Reveal

Hello everyone! Today I wanted to share the March 1, 2015 sketch reveal at Stuck?! Sketches.  I really love the gold trend at the moment and thought I would create a layout with gold, black and white.  I love the softness and elegance of vellum and My Mind's Eye has some nice vellum paper.  Gold doilies and gold buttons finish the look.


Here are some detailed photos


  Here is the sketch:


Come and play along with us at Stuck?! Sketches and link up your take on the sketch for a chance to win some prizes. All of the team's layouts and details on how you have a chance to win are found here.  I am looking forward to see what everyone creates. Thanks for stopping by!