Showing posts with label My Creative Scrapbook. Show all posts

Monday, May 21, 2018

My Creative Scrapbook - May Tutorial

Hello friends! I love banners for all occasions and I thought I would create a Spring banner with the May Creative Kit for My Creative Scrapbook.  

Spring Banner

May 2018 Creative Kit - My Creative Scrapbook

To create the above banner you will need:

Basic Supplies

Adhesive (liquid glue, permanent tape runner adhesive and foam squares)
Fringe Scissors ((optional - can also cut fringe with basic scissors but easier with fringe scissors)
Paper Hole Punch
Paper Trimmer
Pencil
Ruler
Scalloped Paper Punch
Scissors
Sewing Machine (optional)
White Thread (optional)


May Creative Kit Supplies - My Creative Scrapbook

American Crafts Banner Kit (12 chipboard banner pieces and black and white twine)
Chipboard Stickers (Happy Word)
Stickers (Always Be Happy Sticker, Spring Word Stickers)
Patterned Paper - Yellow Gingham, Pink Patterned Paper, Multi Color Striped, Multi-colored Floral Patterned Paper, Light Blue Floral Patterned Paper
Pom Pom Ribbon (White)

Instructions

Using one of the banner pieces as a template, trace with a pencil and cut the yellow gingham paper.

Adhere paper to the banner piece and then add the two holes on the yellow gingham paper with a hole punch matching up the holes from the banner piece. Repeat and create twelve banners.


With the paper trimmer, trim the multi-colored striped patterned paper vertically into 1/2 inch strips. You will need 12 strips to fit the top edge of the banner.


With a tape runner adhesive, adhere the multi-colored stripe paper strips to the top edge of the yellow gingham paper banner piece. Trim.


With a piece of the pink patterned paper, a pencil and a ruler, mark the pink paper 2 1/2 inches from the top of the yellow gingham paper. 


Trim the pink patterned paper as shown below. 


Take a pair of scissors, or fringe scissors, and cut fringe on the narrower side of the pink patterned paper.


Adhere the pink fringed paper flush with the multi-colored paper strip and adhere.


Machine stitch around the multi-colored striped paper strip and along the entire edge of the banner.


Punch twelve scalloped circles from the blue and white patterned paper and set aside.


Flip the blue and white patterned paper scalloped circle to the backside and adhere a foam square.


Place the popped up scalloped circle to the banner centering it below the multi-colored paper strip and the pink patterned paper fringe as shown below.


On the first five banner pieces, adhere with liquid adhesive, the chipboard alphabet stickers "H" "A" "P" "P" "Y"  to the center of the blue and white patterned paper scalloped circles that are popped up with a foam square.


Cut a piece of white pom pom ribbon (about 3 to 4 pom poms in length) and adhere with some liquid adhesive at the top of the fringe on the pink patterned paper as shown below.

 Repeat for all twelve banners. Add the "Always Be Happy" sticker popped up with a foam square. to the sixth banner. 


On the sticker sheet, find the alphabet stickers that spell out the word "spring". With a foam square pop up each alphabet sticker with another foam square. Fussy cut some flowers from the floral patterned paper and place them beside the spring alphabet stickers creating a cluster.  

Punch two holes on the left and right side near the top edge of each banner.

Arrange all twelve banners in the order that they should appear. Add the black and white twine feeding the twine through each punched hole. 


Voila! The banner is completed! 

I hung my banner on the mantle of my fireplace to celebrate Spring.


I hope you enjoyed this tutorial and are inspired to create a banner. They are fun to create and they can be for any occasion. The sky is the limit!

Thanks for stopping by!


Saturday, May 5, 2018

Reveal Of The May Kits

Hello friends! Happy National Scrapbook Day!

I'm back today with the reveal of all the gorgeous kits for May at My Creative Scrapbook.

May 2018 Main Kit

May 2018 Creative Kit

May 2018 LE Kit

May 2018 Album Kit

I created three layouts and a banner to celebrate Spring with the May Creative Kit.


Thanks for stopping by. Be sure and check out the designer gallery for lots more inspiration at My Creative Scrapbook and order your kits today.

Happy scrapping!


\

Friday, April 13, 2018

My Creative Scrapbook April Tutorial

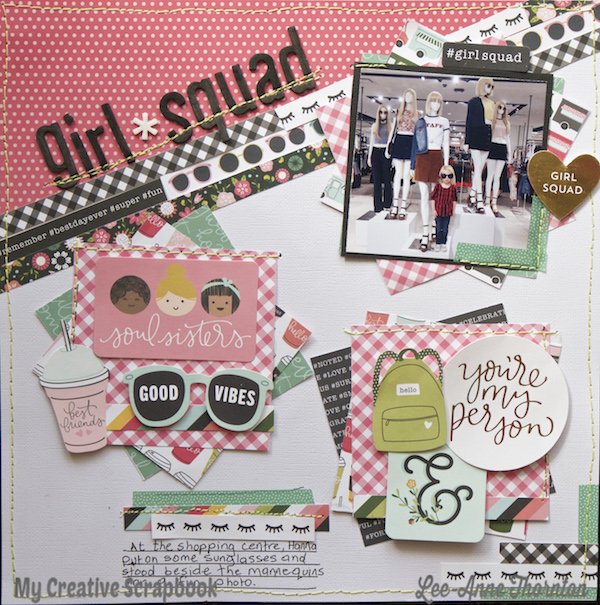
Hello friends! Today I wanted to share a quick tutorial on how I altered my white foam alphabet stickers that were included in the April Creative Kit for My Creative Scrapbook.

To alter the white foam alphabet stickers on the layout below, I used a black Faber Castell Pitt Big Brush Pen. These pens come in an assortment of colors, are permanent India ink and won't bleed. The ink dries quickly and I have found they are perfect for this technique. The pens are also used in mixed media and stamping images instead of an ink pad. I wanted to alter my title "Girl Squad" in black to coordinate with my layout.


I created a short video on how to do this. Beware, I am a newbie at making videos, but practice makes perfect right? When I get more experienced at this, I will add my voice.
Check it out here:


Thanks for stopping by and I hope I have inspired you to alter your white foam alphabet letters for your projects.

Have a wonderful day!

Tuesday, April 3, 2018

April Sneak Peeks

Hello friends! Can you believe it's April? I am finding it very hard to believe because there is still a ton of snow where I live and the temperatures are very cold.

The sneak peeks are here for the April 2018 kits at My Creative Scrapbook and they make it feel a little more like Spring for me. The kits are so pretty! Pam, the owner, always does a superb job of putting the kits together. They all coordinate so well!

April 2018 Main Kit Sneak Peeks

April 2018 Creative Kit Sneak Peeks

April 2018 Limited Edition Sneak Peeks

April 2018 Album Kit Sneak Peeks
It's only two more days to wait until the big design team reveal so be sure and check back and reserve your kits today.

Have a crafty day!

Tuesday, March 20, 2018

My Creative Scrapbook March Tutorial

Hello scrappy friends! It's Lee-Anne here on the blog and today I wanted to share a simple and fun technique on how to create paint splats on scrapbook layouts.

I don't know about you, but sometimes I think it's fun to play with paints and other mediums to create something a little more artsy.

Remember that in scrapbooking, there are no mistakes and my motto is to just have fun and enjoy the process.


For my layout, I backed the Floral Globe cut file, which is cut with my electronic die cutting machine on one of the sheets of patterned paper from the March Creative Kit, with a piece of white cardstock of which I added my teal and coral paint splats. 

I also wanted to mention that there are always several exclusive complimentary cut files included in the kits each month that can be cut with a Silhouette Cameo, Cricut, or Brother Scan N Cut electronic die cutting machines. 


I will show you how I created the paint splats. Let's begin.

Supplies For Paint Splats

Craft Mat
Heat Gun
1 - 12X12 or 8 1/2 X 11 Sheet of White Cardstock
Acrylic Paint Daubers - I used two colors - teal and coral
Water Mister
Water
Paint Brush or Water Brush - to mix the paints

Instructions
  1. Shake paint bottle well and with the the paint dauber, apply some paint to the craft mat.
  2. Fill a mister with water and spritz a small amount of water and combine the paint and water      adding enough water so that the paint is a fairly thin consistency.
  3. Place the paint dauber into the paint picking of some of the paint and "stamp" the white cardstock. If the paint is a thin consistency, it should create a paint splat with tiny little trails.  Let dry.  
  4. Repeat with the other paint dauber making sure that there are several paint splats in both teal and coral. Let dry.
  5. Now you can back the paint spatted white cardstock behind the floral globe design. Trim and machine stitch if desired.
  6. Voila! You have created paint splats!
Check out some of the photos below of my paint splats:


I hope you enjoyed my quick tutorial on how to create fun paint splats. It takes a little practice so be sure to practice on some scrap pieces of cardstock first before creating your project. Have fun!

Be sure to check out all the wonderful kits at My Creative Scrapbook

Thanks for stopping by and happy creating!


Saturday, March 17, 2018

Blessed To Be Your Mom

Hi friends! I always love created family themed layouts and this one of my daughter and I is no exception.

The March Sketch for My Creative Scrapbook was my starting point.  Fellow design team member Laura Whitaker designed the sketch. I love the simplicity of the sketch.

I used the March Creative Kit and an exclusive cut file, that are included in the kits, on my layout.


I love the circle alpha stickers included in the kit to add to my title. 


I really love the colors of the papers in this kit and the feather patterned paper that is so trendy. I added some chipboard elements to the layout to give it more dimension and interest.


Be sure and play along with My Creative Scrapbook and the monthly sketches. Check out all the details on prizes that can be won just by uploading your take on the sketch.  

Happy creating!