Showing posts with label cut files. Show all posts

Thursday, April 5, 2018

April Kits Reveal

Hello friends! Yay! It's reveal day of the four kits at My Creative Scrapbook and they are fabulous!

My Creative Scrapbook April 2018 Main Kit
My Creative Scrapbook April 2018 Creative Kit

My Creative Scrapbook April 2018 LE Kit

My Creative Scrapbook April 2018 Album Kit
I was asked to create some projects with the April Creative Kit and I had a lot of fun with the exclusive electronic cut files (included in each month's kit) that I cut out on my electronic die cutting machine. The papers and embellishments are mostly from the Pebbles Inc. Girl Squad Collection. I have three layouts to share and will be adding some later this week. 


I hope you are inspired to create and also, be sure and check out the My Creative Scrapbook website to see who is guest designing this month as well as the always amazing designer gallery for more inspiration.

Have a lovely, creative day!

Tuesday, March 20, 2018

My Creative Scrapbook March Tutorial

Hello scrappy friends! It's Lee-Anne here on the blog and today I wanted to share a simple and fun technique on how to create paint splats on scrapbook layouts.

I don't know about you, but sometimes I think it's fun to play with paints and other mediums to create something a little more artsy.

Remember that in scrapbooking, there are no mistakes and my motto is to just have fun and enjoy the process.


For my layout, I backed the Floral Globe cut file, which is cut with my electronic die cutting machine on one of the sheets of patterned paper from the March Creative Kit, with a piece of white cardstock of which I added my teal and coral paint splats. 

I also wanted to mention that there are always several exclusive complimentary cut files included in the kits each month that can be cut with a Silhouette Cameo, Cricut, or Brother Scan N Cut electronic die cutting machines. 


I will show you how I created the paint splats. Let's begin.

Supplies For Paint Splats

Craft Mat
Heat Gun
1 - 12X12 or 8 1/2 X 11 Sheet of White Cardstock
Acrylic Paint Daubers - I used two colors - teal and coral
Water Mister
Water
Paint Brush or Water Brush - to mix the paints

Instructions
  1. Shake paint bottle well and with the the paint dauber, apply some paint to the craft mat.
  2. Fill a mister with water and spritz a small amount of water and combine the paint and water      adding enough water so that the paint is a fairly thin consistency.
  3. Place the paint dauber into the paint picking of some of the paint and "stamp" the white cardstock. If the paint is a thin consistency, it should create a paint splat with tiny little trails.  Let dry.  
  4. Repeat with the other paint dauber making sure that there are several paint splats in both teal and coral. Let dry.
  5. Now you can back the paint spatted white cardstock behind the floral globe design. Trim and machine stitch if desired.
  6. Voila! You have created paint splats!
Check out some of the photos below of my paint splats:


I hope you enjoyed my quick tutorial on how to create fun paint splats. It takes a little practice so be sure to practice on some scrap pieces of cardstock first before creating your project. Have fun!

Be sure to check out all the wonderful kits at My Creative Scrapbook

Thanks for stopping by and happy creating!


Monday, February 12, 2018

My Creative Scrapbook February Kits

Hello friends! Every month there are four new kits at My Creative Scrapbook and they are always beautiful and bursting with goodies. February's kits are awesome and this month I created with the gorgeous February Creative Kit. Check out the kits:

February Creative Kit

February Main Kit

February LE Kit

February Album Kit
I created four layouts with the February Creative Kits and they are all about love to Valentine's Day.

For the first layout, I wanted to created a layout of my excitement to be a first time grandma. I cut out the doily, butterflies, and flowers from cut files, that are included free with the kits, on my Silhouette Cameo, backed the flowers with some patterned paper and added some red sequins, which are included in the kit. i also added some computer generated journaling on some white cardstock, added the foam alphas for the title, and also some ephemera and ribbon from the kit. 


 For this layout I began with a white piece of cardstock for the background, handstitched some vertical lines with various colors of embroidery floss and added some punched paper hearts, wood hearts and sequins. This directs the eyes downwards towards the photo. I also added some stickers, and the black foam alphas for the title as well as some wood arrows and ephemera.

For this layout, I began with the vertical hearts patterned paper for the background and punched lots of paper hearts from an assortment of the papers in the kit and embellished with some wood hearts, pink and red sequins, stickers and wood arrows.


For this layout (which is my personal favorite) I drew a freehand heart shape on a piece of white cardstock and hand stitched the heart shape with light pink, red, and medium pink embroidery floss in somewhat of an ombre fashion and then I went crazy with embellishments from the kit.  I also added one flower cut file that I backed with pink patterned paper. This was a fun layout to create.


Well there you have it. My four layouts that I designed with the February Creative Kit and the four February kits from My Creative Scrapbook. 

Order your kits now here and also check out what the talented design team created with all the kits in the February designer gallery here.

Have a wonderful day!


Friday, January 12, 2018

Baby It's Cold Outside

Hello friends! Today I wanted to share a winter layout of my pup enjoying his first winter in the snow.


For my layout I used papers from the Snow & Cocoa Collection by Crate Paper for the patterned papers, stickers, chipboard and ephemera. I must admit that this is one of my favorite winter collections ever. Don't you just love the mint green and soft pinks?


I began my layout by smooshing some pink watercolor paint mixed with a tiny bit of white watercolor paint and brushing it onto a piece of cellophane packaging and smooshing it onto the white cardstock background. Once it was dry, I chose two cut files, the Snowflake Background and the Handcut Letters cut file that I offset on my Silhouette Cameo, welded them to make one large title and backed it with some patterned papers. To make it more dimensional, I popped it up on some foam adhesive squares over the Snowflake Background. 


I added a polar bear flair button, which is one of the flair buttons from the Animal 3 Flair set from A Flair For Buttons to the left hand side of the word "it's" in my title to direct the eye to the title. 


I matted the two photos of my pup on green checked patterned paper and embellished the layout in some chipboard stickers, ephemera and gold sequins.


Lastly, I added strips of patterned papers around the edge of the layout and machine stitched them so they weren't going anywhere and some gold mist splatters.


I will be taking a little break and going on a week's vacation and getting away from the -30 temperatures. My youngest son and I will be flying to southern California to enjoy some warmer weather and explore Disneyland, Universal Studios and San Diego. We can't wait!

Have a nice weekend!


Tuesday, October 17, 2017

Everyday Silly Pumpkins

Hello friends! I hope you are doing well. Today at A Flair For Buttons, I am sharing this layout of these cute kiddos.


It's not your typical colors for an autumn layout, but there are no rules in scrapbooking and I sometimes get bored with the usual colors and want to try something fresh.

For this layout I chose papers, die cuts and sequins from the Paige Evan's Turn The Page Collection. I'm a huge fan of Paige's designs and I thought while I'm at it, it would be a good reason to use some of her awesome cut files from the Silhouette online store. I chose the Pumpkin (Design ID #222477) and the Cloud Trio (Design ID #216711). I cut the designs on white cardstock with my Silhouette Cameo and backed them with patterned paper. For the clouds, I backed them with vellum, added some sequins and backed them with patterned paper.


Whenever I can, I love to use flair buttons on my projects and when I saw this cute winking emoji in my stash, which is from the Faces Flair Set, I knew I wanted to include it on my layout so I placed it on top of the tag to the left of my photo to direct the eyes to the photo.


I also am a huge fan of hearts and I found this flair button from the Woodland Creatures Flair Set and decided to place it on the bottom right corner of my layout.


I hope you enjoyed your visit today. Be sure and check out all the eye candy flair at A Flair For Buttons.

Happy scrapping!

Faces Flair Set


Monday, October 16, 2017

Some Layouts With The My Creative Scrapbook October Creative Kit

Hello friends! I hope you are having a fabulous Monday so far. I wanted to share six layouts that I created for 
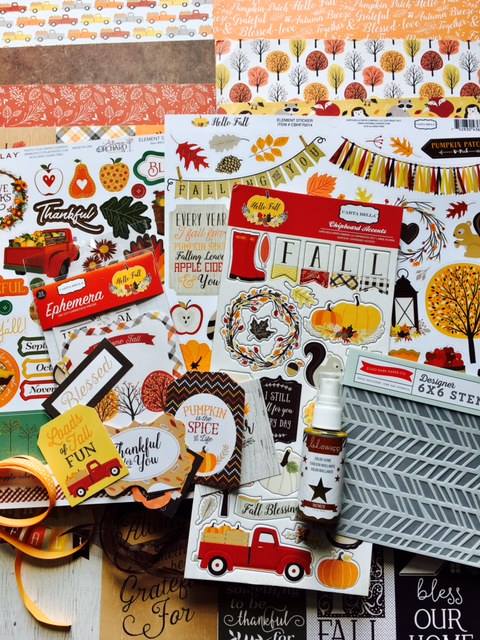
My Creative Scrapbook with the awesome October Creative Kit. This kit consisted of some beautiful papers, stickers, and die cuts from the gorgeous Carta Bella Hello Fall Collection.


For this layout I used a square paper punch and punched several paper squares and then cut the squares on the diagonal to create triangles. I paper pieced the paper triangles together to create a "quilt" design. I was going for a homespun feel for this family page.


For this layout of my son I was going for a fun, mixed media layout. I used the Heidi Swapp Color Shine in the "Tea" color and splattered ink down the page diagonally. When it was dry and I added the matted photo and placed paper strips, die cuts and chipboard stickers. I was going for a fun, carefree page.


For this page, I used the some free cut files, which are included in the Creative Kit and cut out the title "blessed" with my electronic cutting machine on some of the orange patterned paper and popped it up with some dimensional dots for more dimension. The leaf wreath was also a cut file included with the kit. I cut this onto the orange and brown plaid patterned paper.


For this layout, the paper leaves were drawn freehand and cut out on various patterned papers from the kit. With a bone folder, I folded the leaves, layered them and popped them up with dimensional adhesive behind the photos. I also added some paper confetti that was punched out with my Swiss Cheese Paper Punch. This gives the look of falling leaves.


For this layout I cut paper strips and weaved them diagonally and then matted my photo and added lots of die cuts, chipboard stickers and ribbon. I wanted to create a "lattice" look to this layout to appear like a lattice pie.


Finally, for this layout, I added an inked border with the stencil, included in the kit, and some distress ink and then added some ink splatters. I added lots of paper strips, stickers, chipboard stickers and diecuts for fun, random look.

Well there you have it. These are my six layouts that I created with the fabulous October Creative Kit.

My Creative Scrapbook October 2017 Creative Kit
This kit and three other kits are available to purchase at My Creative Scrapbook

Thanks for stopping by and happy paper crafting!