Tuesday, November 7, 2017

The Mountains Are Calling And I Must Go


Happy Tuesday! Today I wanted to share a photo that I captured this morning of one of my favorite places on earth. 

It has been so hectic lately and my husband knew after my surgery, that it was time to get away. The mountains were calling and we must go. What a nice surprise and getaway for my upcoming birthday! I wanted to be sure to bring my camera gear that I have had stashed away since I got my Iphone 7+.  It takes awesome photos, but there is still something to be said about the good old DSLR camera. I was determined to dust it off and capture some of the beautiful scenery that surrounds me. 

This is a photo of Mount Lawrence Grassi that is in the background of the town of Canmore. I captured this photo at sunrise this morning. It is a cold, snowy November day, but that doesn't stop me. Ski season will be upon this area soon and it gets me in the Christmas spirit. I just might have to check out the shops and do some Christmas shopping. 

When I was a child, I camped in this area probably at least one hundred times. It is my old stomping grounds where I went up and down the cutlines with my dirt motorcycle, played hide and go seek at night with my brothers and camping friends and watched the stars. 

My family had dirt motorcycles and an RV and it seemed like almost every weekend from March to October, we would head out to the mountains near our home and camp. Canmore was a very small town when I was a child, but now it is a bustling town with shops, restaurants and hotels and some of the best cross-country skiing and downhill skiing in the world. I love where I live. 

Usually I share my paper crafting projects, but my other passion is photographing the mountains and wildlife. Now off to go for a hike and see if my husband and I spot some wildlife. 

Have a beautiful day!


Monday, November 6, 2017

My Creative Scrapbook November Cards

Hello friends! I hope you are surviving this Monday. It is very cold and snowy where I live and although the winters are long, I love creating winter paper projects and crafts.

The November Creative Kit from My Creative Scrapbook is one of my favorite kits because it is totally me.


Anyone that knows me, knows that the mountains and anything rustic and woodsy is my style. The mountains are my favorite place to be and I adore being in the woods and love wildlife. It must have influenced me a lot when I was a child and my family camped in the mountains a lot. My home also reflects this because it is a timber frame style and I love rustic decor and accents. Anyways, I am blabbering.

 Here are five cards that I created with the kit.


I just loved the bear and moose embellishments. 

These were simple cards to make. I used the 3X4 cards from the kit and lots of scraps of paper left over from the kit after I created four layouts. I create the layouts first and make cards with the bits and pieces of papers and embellishments left over. There wasn't too much left from the kit. It was too cute not to use it all up.

I hope you enjoyed my cards. Check out all four of the beautiful November kits at My Creative Scrapbook and order yours today here.

Have a lovely day!

Sunday, November 5, 2017

My Creative Scrapbook November Kits Reveal

Hello friends! Happy Sunday! Today is the November reveal of all four kits and you are going to love them. I know I sure do!

The design team did a fabulous job with the kits and I love each and everyone's signature style.

Here are the kits:

My Creative Scrapbook November Main Kit
My Creative Scrapbook November Creative Kit

My Creative Scrapbook November LE Kit

My Creative Scrapbook November Album Kit


Aren't they awesome? I love every single one of them.  To see what all the designers created with these kits, go here. 

I created with the November Creative Kit and I must admit that it was one of my favorite kits this year. It has papers and embellishments from the Echo Park/Carta Bella Cabin Fever Collection. It's perfect for me because winter is definitely snowy in my area. I love the woodsy, rustic look to this kit. I created four layouts and 5 cards with this kit and just about used it up completely. Creating came easy with this one. Here is one of my layouts. I will be sharing a tutorial on this layout later this month so be sure and check back soon.


Thanks so much for stopping by and if you like what you saw, be sure to reserve your kits at My Creative Scrapbook today. Just click here to find out all the details on how to order a kit.

Bye for now.


Saturday, November 4, 2017

My Creative Scrapbook Sneak Peeks For November

Hello friends! I thought I would share some sneak peeks of the four awesome My Creative Scrapbook November kits. The design team has done a wonderful job creating with all four of the kits. Here is a peek at the four kits:

November 2017 Main Kit

November 2017 Creative Kit

November 2017 LE Kit

November 2017 Album Kit

Have the sneak peeks piqued your interest? November 5 is the full reveal of the kits and the design team November gallery will be posted at My Creative Scrapbook. Be sure and check it out tomorrow! There will be lots of creative inspiration.

Have an awesome day!


Friday, October 20, 2017

My Creative Scrapbook October Layout Tutorial

Hello friends! Today I wanted to share a step by step tutorial of a layout that I created for My Creative Scrapbook with the October 2017 Creative Kit.

My Creative Scrapbook October Creative Kit

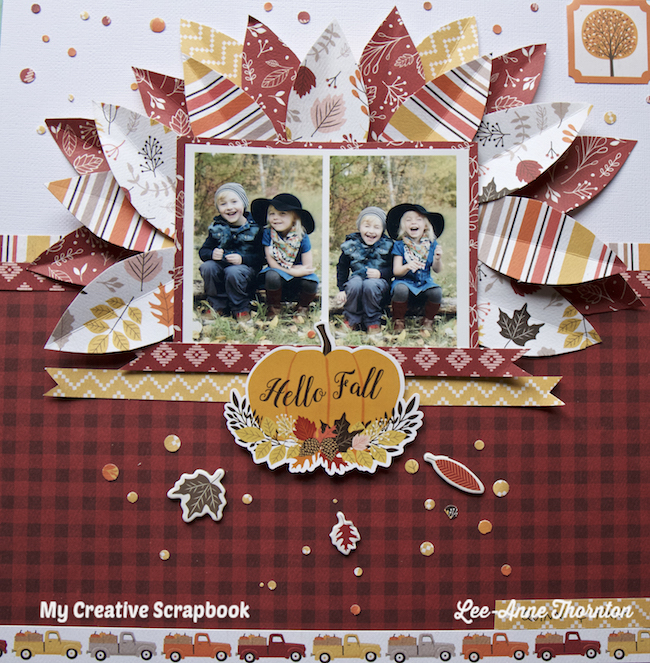
Here is the layout...


I really love the warm colors in the October Creative Kit. It just screams autumn and Thanksgiving. This layout looks complicating, but I assure you that it is a fairly simple layout to create. The bonus is that to create this layout, it doesn't require any fancy tools.

Let's get started. You will need:

Basic Supplies For This Layout

Adhesive (a tape runner works well. I used my Scotch ATG gun)
Bone folder (to score the hand cut leaves)
Cardstock (12 X 12 sheet of white textured cardstock)
Foam dots, squares, or tape (for adding dimension to the hand cut leaves and the Hello Fall sticker)
Liquid Adhesive (for the paper confetti pieces. I use Tombow Liquid Adhesive)
Paper Punch (a hole punch, confetti punch or the Fiskars Swiss Cheese Border Punch - I used the Fiskars Swiss Cheese Border Punch)
Paper trimmer (to trim the patterned papers)
Pen (black fine line pen)
Pencil (to hand draw leaves)
Scissors (to hand cut leaves)
One photo measuring 5 X 3 1/2  inches or two photos combined to measure 5 X 3 1/2  inches.

October Creative Kit 

1 - 12 inch by 7 1/4 inch piece buffalo check patterned paper (the burgundy and black check piece of paper)
1 - 12 inch by 1/2 inch strip of the multi-colored pickup truck patterned paper
1 - 12 inch by 1/2 inch strip of the yellow and white patterned paper
2 - 12 inch by 1/2 inch strips of the burgundy and white patterned paper with the diamond design
1 - 12 inch by 1/2 inch strip of the multi-colored striped patterned paper
1 - 5 1/4 inch by 4 inch piece of the burgundy and white patterned paper with the tree branch print
Several pieces of patterned papers for the hand cut leaves (see layout above for example)
Leaf chipboard stickers (from the chipboard sticker pack)
Hello Fall Sticker (from the sticker sheet)
Orange tree die cut (from the ephemera pack)

Instructions

Begin with the 12 X 12 sheet of white textured cardstock.

Adhere the 12 inch by 7 1/4 inch piece of buffalo check paper to the bottom of the white cardstock.

Mat the photos on a piece of burgundy and white patterned paper, with the tree branch print, with foam squares to the backside near the middle of the photos. This will ensure that the hand cut leaves will tuck behind the photos later.


Add the multi-colored strip of paper of striped paper to the top edge of the buffalo check paper and adhere.

Add the burgundy and white diamond print strip of paper directly below the multi-colored striped paper strip and adhere.

Add another burgundy and white diamond print strip, which has been cut on both edges with scissors, to make a banner. Adhere to the bottom of the photos as shown.

Add the yellow and white patterned paper strip, which has been cut on both edges with scissors, to make a banner. Adhere below the burgundy and white diamond print strip as shown.

On several sheets of patterned paper from the kit, hand draw some leaf shapes with a pencil and cut out with scissors. I cut out several leaves. Check out the layout to see approximately how many leaves I cut. I used four different patterned papers.


With a bone folder, score down the middle of each hand cut leaf and bend.


Begin tucking the scored leaves behind the photos as shown below.


 I added the 5 leaves from the leaf patterned paper behind the photos as shown below.


Next I added four multi-colored striped leaves to fill in the spaces.


Finally, I added the burgundy and red patterned paper, with the tree branch print, behind the other leaves as shown. Be sure to fill in the empty spaces between the leaves.


Finally, I added two yellow and white patterned paper leaves behind the other paper leaves as shown.


Now it's time to embellish the layout with paper confetti.  I used the Swiss Cheese Border Punch and scraps of the patterned paper from the kit and punched out several circles.


 I arranged the paper confetti on the white card stock background randomly and applied a tiny bead of liquid adhesive to the back of each circle of paper confetti and stuck them down.


I added more paper confetti on top of the buffalo check paper and applied a bead of liquid adhesive and glued them down. I adhered three leaf chipboard stickers. Next, I added the "Hello Fall" sticker that I popped up with some foam squares to the back and adhered it to the middle of the layout below the photos and on top of the banner paper strips.

Adhere the paper strip of the pickup trucks to the bottom edge of the buffalo check paper. On a small strip of white and yellow patterned paper, I wrote the names of the children with a black fine line pen.


Finally I added the orange tree die cut to the top right corner of the layout.


Voila! The layout is now complete!

I hope you enjoyed my tutorial and give this a go. It may be a little time consuming, but the results are worth it.  

Thanks for stopping by and be sure to check out the October Creative Kit and all the kits at My Creative Scrapbook. Each month there are four kits to suit any scrapbooker's style.

Happy scrapping!