Showing posts with label paper punch. Show all posts

Friday, October 20, 2017

My Creative Scrapbook October Layout Tutorial

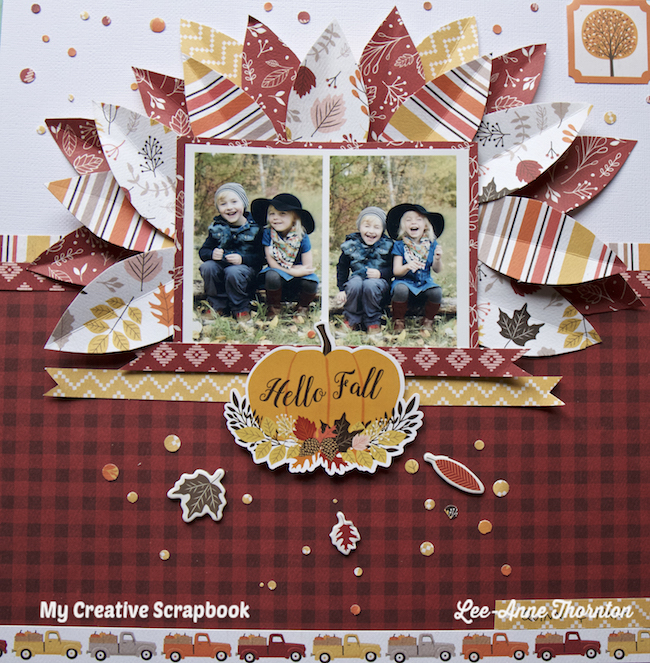
Hello friends! Today I wanted to share a step by step tutorial of a layout that I created for My Creative Scrapbook with the October 2017 Creative Kit.

My Creative Scrapbook October Creative Kit

Here is the layout...


I really love the warm colors in the October Creative Kit. It just screams autumn and Thanksgiving. This layout looks complicating, but I assure you that it is a fairly simple layout to create. The bonus is that to create this layout, it doesn't require any fancy tools.

Let's get started. You will need:

Basic Supplies For This Layout

Adhesive (a tape runner works well. I used my Scotch ATG gun)
Bone folder (to score the hand cut leaves)
Cardstock (12 X 12 sheet of white textured cardstock)
Foam dots, squares, or tape (for adding dimension to the hand cut leaves and the Hello Fall sticker)
Liquid Adhesive (for the paper confetti pieces. I use Tombow Liquid Adhesive)
Paper Punch (a hole punch, confetti punch or the Fiskars Swiss Cheese Border Punch - I used the Fiskars Swiss Cheese Border Punch)
Paper trimmer (to trim the patterned papers)
Pen (black fine line pen)
Pencil (to hand draw leaves)
Scissors (to hand cut leaves)
One photo measuring 5 X 3 1/2  inches or two photos combined to measure 5 X 3 1/2  inches.

October Creative Kit 

1 - 12 inch by 7 1/4 inch piece buffalo check patterned paper (the burgundy and black check piece of paper)
1 - 12 inch by 1/2 inch strip of the multi-colored pickup truck patterned paper
1 - 12 inch by 1/2 inch strip of the yellow and white patterned paper
2 - 12 inch by 1/2 inch strips of the burgundy and white patterned paper with the diamond design
1 - 12 inch by 1/2 inch strip of the multi-colored striped patterned paper
1 - 5 1/4 inch by 4 inch piece of the burgundy and white patterned paper with the tree branch print
Several pieces of patterned papers for the hand cut leaves (see layout above for example)
Leaf chipboard stickers (from the chipboard sticker pack)
Hello Fall Sticker (from the sticker sheet)
Orange tree die cut (from the ephemera pack)

Instructions

Begin with the 12 X 12 sheet of white textured cardstock.

Adhere the 12 inch by 7 1/4 inch piece of buffalo check paper to the bottom of the white cardstock.

Mat the photos on a piece of burgundy and white patterned paper, with the tree branch print, with foam squares to the backside near the middle of the photos. This will ensure that the hand cut leaves will tuck behind the photos later.


Add the multi-colored strip of paper of striped paper to the top edge of the buffalo check paper and adhere.

Add the burgundy and white diamond print strip of paper directly below the multi-colored striped paper strip and adhere.

Add another burgundy and white diamond print strip, which has been cut on both edges with scissors, to make a banner. Adhere to the bottom of the photos as shown.

Add the yellow and white patterned paper strip, which has been cut on both edges with scissors, to make a banner. Adhere below the burgundy and white diamond print strip as shown.

On several sheets of patterned paper from the kit, hand draw some leaf shapes with a pencil and cut out with scissors. I cut out several leaves. Check out the layout to see approximately how many leaves I cut. I used four different patterned papers.


With a bone folder, score down the middle of each hand cut leaf and bend.


Begin tucking the scored leaves behind the photos as shown below.


 I added the 5 leaves from the leaf patterned paper behind the photos as shown below.


Next I added four multi-colored striped leaves to fill in the spaces.


Finally, I added the burgundy and red patterned paper, with the tree branch print, behind the other leaves as shown. Be sure to fill in the empty spaces between the leaves.


Finally, I added two yellow and white patterned paper leaves behind the other paper leaves as shown.


Now it's time to embellish the layout with paper confetti.  I used the Swiss Cheese Border Punch and scraps of the patterned paper from the kit and punched out several circles.


 I arranged the paper confetti on the white card stock background randomly and applied a tiny bead of liquid adhesive to the back of each circle of paper confetti and stuck them down.


I added more paper confetti on top of the buffalo check paper and applied a bead of liquid adhesive and glued them down. I adhered three leaf chipboard stickers. Next, I added the "Hello Fall" sticker that I popped up with some foam squares to the back and adhered it to the middle of the layout below the photos and on top of the banner paper strips.

Adhere the paper strip of the pickup trucks to the bottom edge of the buffalo check paper. On a small strip of white and yellow patterned paper, I wrote the names of the children with a black fine line pen.


Finally I added the orange tree die cut to the top right corner of the layout.


Voila! The layout is now complete!

I hope you enjoyed my tutorial and give this a go. It may be a little time consuming, but the results are worth it.  

Thanks for stopping by and be sure to check out the October Creative Kit and all the kits at My Creative Scrapbook. Each month there are four kits to suit any scrapbooker's style.

Happy scrapping!


Saturday, September 2, 2017

Meow

Hello friends! I hope you are having a good weekend so far. Today I thought I would share a layout of my cat Sheldon that I created for my design team project that is on the blog today at A Flair For Buttons.


For my layout, I used a 6 X 6 paper pad from Doodlebug Designs and a heart paper punch and punched out several hearts in five colors. With my watercolors, I painted five colors coordinating with the paper hearts on white cardstock. Once the background paint dried, I placed the paper hearts onto the background paper in columns and machine the paper hearts down with my Stitch Happy Sewing Machine and some aqua twine from We R Memory Keepers. I love my new little sewing machine. As you may notice, I stacked two punched heart shapes on the second last row from the bottom to give the layout a little more interest and dimension.


Embellishing was kept to a minimum as I wanted the background and photo to be the focal points of my layout. I used some ephemera, wood shapes and a flair button from the Got Cat Flair set at A Flair For Buttons.


I finished the layout with some enamel dots and splattered some white paint onto the layout.

I hope you enjoyed my layout. Be sure and check out the A Flair For Buttons shop for hundreds more flair buttons. Let me warn you, they are very addictive.

Have a good day!

Flair Used On Layout

Got Cat Flair


Monday, January 23, 2017

Faux Pleats Tutorial - My Creative Scrapbook

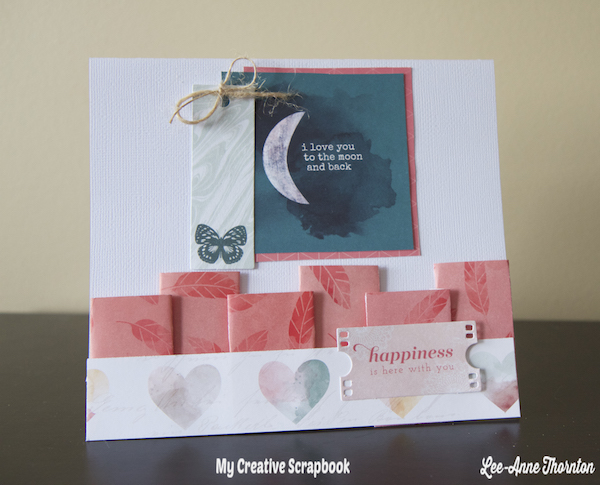
Hello friends! Today I am sharing a quick step by step tutorial on how to create faux pleats on your paper projects.  I have made two layouts and a card with the January Main Kit at My Creative Scrapbook using this fun technique.


I made this card for the tutorial.


So let's begin...

You will need these supplies:

12X12 White Card Stock
Tape Runner Adhesive
Bone Folder
Papers from the Main Kit (as shown)
3 Inch Square Paper Punch


Punch out six squares of pink paper with the paper punch.


After the six squares are punched, score the squares with the bone folder about 1/4 inch on the left and right side of the square as shown.


After scoring, fold over the paper


Starting on the right side of the white cardstock, adhere the pleats as shown being sure to stagger them.


When they are adhered down add the heart paper strip and adhere to the bottom edge of the white card stock.


Check out the dimension of the pleats


To assemble the card, cut down the paper strip with a paper trimmer so it is flush to the left hand side of the pleats and heart paper strip.


Add the "I Love You To The Moon And Back" paper card and mat it with a scrap piece of pink paper.  Add the butterfly die cut, as shown, and adhere them down. Tie a bow with some string.  Add the "happiness is here with you" diecut and adhere.  

The card is now complete!  


 I hope you enjoyed my tutorial and try this technique! Have fun!


Saturday, October 31, 2015

Chevron Layout

Hello friends! Happy Saturday! Today I wanted to share a layout I created of my teenage son inspired by a layout created by Paige Evans.  I also wanted to bust my stash and use some older papers.


 I love creating teen layouts and back to school layouts and I also love 6X6 paper pads.
 This layout was created with the Off To School Collection by Fancy Pants Designs way back in 2011.


I cut out the title "Clay" on white card stock with my Silhouette Cameo, watercolored it with Tim Holtz Distress Ink in Squeezed Lemonade and splattered some Liquitex Black India Ink.

For the triangle paper shapes, I took a one inch square paper punch and punched out square shapes and them cut them in half diagonally.  Then I arranged the paper triangles in a pattern repeating the colors and pattern five times on the page creating chevrons.


Sewing machines are great for adhering papers on a layout so I used some temporary adhesive very sparingly to hold the paper triangles in place and then machine stitched along the papers in a zig zag design with white thread adhering them to the white card stock background.

Matting the photo is simple with the 6 X 6 pads.  I love lots of layering and texture behind the photo.


To complete the layout, I journaled with a black pen below the bottom chevron in a zig zag design, and last but not least, a flair button from A Flair For Buttons and some red embroidery thread to make the flair button pop.

I hope you enjoyed your visit.  Thanks for stopping by and I hope you have a great Saturday!

Saturday, October 17, 2015

I Love Simple Stories!

Hello friends! Happy Saturday!  Today I have another Fall layout to share.  Lately, I have been scrapbooking with a lot of Simple Stories collections and I decided to dig out a collection from last year called Sweater Weather.  I added in a woodgrain background paper from the new Pumpkin Spice Collection.  I love when I can use different collections on a layout from the same manufacturer.


I really wanted to use up some paper scraps so I used my square 3 1/2 inch square paper punch and punched out several papers, used my corner rounder on all four sides of each square and inked the edges with some Tim Holtz Distress Ink in Gathered Twigs. 

 I love to layer papers so I randomly layered the squares until I was happy with the placement and adhered them to the background woodgrain paper.  I added two photos that I also punched out with my square paper punch and rounded the corners.  I added a diecut for the title and embellished with some chipboard for dimension and added some enamel dots and word stickers.


I love Fall and love creating layouts using paper punches.  I hope you are inspired to take out and dust off your paper punches and create a layout or card.  Thanks for stopping by and hope you have a great day