Showing posts with label son. Show all posts

Sunday, April 23, 2017

Donut Worry Be Happy

Happy Sunday! Today I am sharing this layout of my son and a whole lot of donuts over at A Flair For Buttons.


I really love how flair is a great little addition to the circle element of this layout. I used a flair button from the Inspirational Words 5 flair set and the heart flair button from the Woodgrain 3 flair set.


The donut die cuts were a free cut file that Kim Watson designed for the Scrapbook & Cards Today Magazine Spring 2017 issue on Page 24. When I saw the cut file I was excited to cut it out on my Silhouette Cameo.  


I used lots of scraps of various collections of Bella Blvd. papers and paper and stickers from the new Doodlebug Designs Cream And Sugar Collection.  


The title was actually a die cut sticker that I popped up with some dimensional adhesive squares.


Handwritten journaling was added with a fine black felt pen to give it more of a personal feel to the page.


Paint splatters from the Navy Colorshine Mist by Heidi Swapp were added to complete the page.


Below are the flair sets I used for my layout:

Woodgrain 3 Flair Set

Inspirational Words 5 Flair Set

Be sure to stop by the A Flair For Buttons shop and check out these flair sets and hundreds more. 

Thanks for stopping by and I hope you have a great day

Wednesday, January 4, 2017

Wonderful Memories

Hello friends! Happy New Year! Today I am sharing my very first layout for 2017 for both Just Nick Digital Cut Files using the Word 3 cut files for my title


and also a flair button from the Good Dog flair set from A Flair For Buttons. 


 Here is the layout I created of my son and my puppy Syd.


For this layout, I wanted to document when my family added Syd, a male Golden Retriever puppy to our home.  My son is holding him for the car ride home.  Syd was a ball of fluff.  I love these candid photos of my son.  He is not cooperative about getting photos taken so I was so happy to capture these.


The words "wonderful" and "memories" from the Word 3 cut file set are both cut out with my Silhouette Cameo and some paper from the Doodlebug Designs Puppy Love Collection.

The flair button "woof" was placed where the three photos meet to direct the eye around the photos.


Cut files and flair, my two favorite things in scrapbooking other than paper.

Thanks for stopping by and be sure to check out Just Nick Digital Cut Files for all your cut file needs and flair from A Flair For Buttons!

Have a great day!


Monday, December 12, 2016

Ho Ho Ho Layout

Hello friends!  I hope you are staying warm today.  It has been a deep freeze here in my area for the past week.  I thought I would share another layout with the beautiful December Main Kit at My Creative Scrapbook.  


My youngest son was only three years old when this photo was taken with Santa.  I just love it and I love this kit.  It has everything in it to scrap those Santa and Christmas photos.  


I also added the black card stock tree that is a free cut file that comes with the kit. 

Here is the December Main Kit:


You can order a kit today at My Creative Scrapbook.  It would make a great gift to you or a friend!


Have a great day!


Thursday, May 12, 2016

Snorkle Love

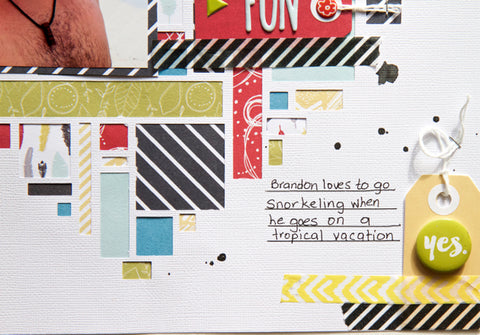
Hello followers!  Today I wanted to share a layout of my oldest son snorkelling.  He loves to travel and when he goes to tropical destinations, he loves to snorkel.
I had fun with the Just Nick Digital Cut Files Bits And Pieces Background cut file and one of my favorite things to do is to back cut files with patterned paper.  
I cut out the Bits & Pieces Background on some white cardstock with my Silhouette Cameo and backed it with some papers from Fancy Pants Design's new Attwell Collection.  I love the colors and thought it would make a great summer page.
Here are some more closeups of my layout:
Here is the  cut file I used for the layout:
 Check out all the designs in the Just Nick store.
Thanks for stopping by! Have a creative day!

Friday, April 22, 2016

Play Ball Layout

Hello followers! Today I am sharing a sports themed layout using the fabulous Baseball Collection of patterned papers and stickers over at Paper House Productions.  This layout is of my youngest son when he played his first year of baseball a few years back.  Time sure does fly as he is now 16.
Paper House baseball1
Play Ball Supply List
IMG_2433
I used my antique sewing machine and stitched along the outside edge of the layout, the navy paper triangle, the circles and also the middle of the baseball stitched paper. I love the extra texture and homespun feel that stitching gives my layouts. This is totally optional.
IMG_2436
I added lots of stickers to the layout and gave some of the stickers added dimension by using some foam adhesive squares on the heart sticker, the title "Play Ball" sticker and some of the baseball stickers.  I also added my son's name with the mini alpha stickers on top of the heart sticker and also on bottom right corner on top of the ticket sticker. 
IMG_2438
IMG_2441
Adding the star stickers directs the eye down the page to the title and photos.  
IMG_2437
The banner sticker strip and the baseball sticker strip are tucked slightly under the 4X6 photo and the 2X3 photo so it finishes it nicely.   I also added the tiny circle heart sticker to the left triangle on the 4X6 photo.
To complete the layout,  I added a little "home plate" sticker beside the small photo and wrote the year with a black pen.
I hope you are inspired to create a sports themed page using the Baseball Collection. Be sure to check out all the beautiful collections at Paper House Productions.  Have a creative day!

Friday, March 4, 2016

Soccer Layout For Paper House Productions

Hello friends! Today I am excited to finally share my first design team layout at Paper House Productions for the 2016 term.

I thought I would begin with a layout of my youngest son, Clayton.  He loves soccer and I wanted to document him playing on his first soccer team at the age of 5.


Here are some more closeups:


I included some instructions to create my layout above.

Instructions:


  1. Begin with a 12X12 sheet of white textured cardstock for the background.
  2. Fussy cut three (3) soccer balls from the soccer ball paper.
  3. Cut two  (2) green strips with white stars.
  4. Cut two (2) strips of soccer words.
  5. Cut the green with white star strips to the left and right edge of the white cardstock and adhere.
  6. Cut the  two soccer word strips to the top and bottom edge of the white cardstock and adhere.
  7. Arrange the three (3) fussy cut soccer balls , as shown on the photo, and adhere.
  8. On the backside of the soccer ball paper there is a soccer field.  Cut two pieces of the green paper.
  9. Mat the photo  (I used a 5 X 7 photo) with the black and white polka dot paper.
  10. Place the green paper behind the photo as shown.
  11. Cut out the blue “Keep Calm And Take The Shot” journal card and place over the green paper  and tuck it in slightly underneath the photo.
  12. Add the stickers as shown.
  13. Add dimensional foam squares to the the top and bottom soccer ball stickers, the “Kick Pass Score” sticker, the soccer cleats sticker, the colored arrow sticker, the “champ” sticker, the top and bottom round star stickers, and the “Love This Game Sticker”.
  14. Add a dimensional foam square to the back of the left paper soccer ball.
  15. Journal with a black acid free pen on the “On The Field” Sticker.
  16. Add sticker ticket and blue mini alpha stickers to spell out the name of the player.
  17. Adhere some black, grey, dark grey, and yellow enamel dots as shown. 
Supplies Used:


Check out all the wonderful high quality products at Paper House Productions here.

Thanks for stopping by!  Happy creating!


Wednesday, February 24, 2016

Gamer Cut Files And Freebie Cut File At Just Nick Digital Cut Files

Hello friends! Today I am on the Just Nick Digital Cut Files blog sharing a layout of my gamer son.


I used the Gamer Cut Files to create this layout.


Here are some closeups of the cut files.  I decided to make the title stand out even more by adding some hand stitching with several colors of embroidery floss.


I just loved the robot cut file.  I added some enamel dots to the eyes and popped up the head and body with some dimensional adhesive squares and added my journaling to the body.


I also added some enamel dots to the gaming controller die cut and some sewing machine stitching.


Thanks for stopping by my blog.  Be sure to check out the Gamer cut files and hundreds more cut files in the Just Nick Digital Cut Files Shop.  Also, there is a freebie cut file to download while you are there.  Use the code SWAKFREE at checkout.


Thanks for stopping by! Have a great day!


Monday, November 16, 2015

Bella Blvd. November Bella Buzz Is Here

Hello friends!  I hope you are having a lovely day.

Today the Bella Blvd. has released their November 2015 Bella Buzz newsletter.  I am excited to have another layout included in the Bella Buzz.
My son Clayton was a pirate for a Halloween party when he was nine years old. I thought he made a cute little pirate with his blue eyes if I say so myself.

I used the Max Collection by Bella Blvd. for this layout and embellished with some hand stitching.  One of my favorite things to embellish my layouts with is flair buttons.  All my flair buttons are from A Flair For Buttons.


To download your free issue of the Bella Buzz you can download it here.  There is a giveaway also.  You can also sign up to subscribe to the newsletter here. To read all the previous Bella Buzz issues you can find them here.

Enjoy your day! Happy creating!