Showing posts with label Chipboard. Show all posts

Friday, May 4, 2018

May Sneak Peeks

Hello friends! The May sneak peeks are up at My Creative Scrapbook and they are awesome!

I created some projects with the May Creative Kit and wanted to share one of my layouts with this adorable kit that includes some papers and embellishments from Echo Park's Hello Spring and Hello Easter Collections, twine, white pom pom ribbon, white foam alphabet stickers and banner pieces from American Crafts and flower stickers from Pebbles Inc.


I took out my circle paper punches and one of my scalloped circle paper punches and punched paper circles in several colors and stacked them. I added some chipboard stickers on top and arranged the stacked paper punched circles on the white background cardstock. 


I had fun with the white pom pom ribbon and cut it apart and glued five pom poms on the sheep chipboard sticker to give it a woolly look.


I also added a white pom pom on the tail of the chipboard bunny.


For the title of the layout "Easter Fun", I added the two border stickers to the bottom of the page and  added the white foam alphabet stickers that I added various colors of Nuvo Crystal Drops in several coordinating colors to give the title some interest and dimension and then added some more chipboard stickers.


Finally I stitched around the edge of the white cardstock with white thread and my sewing machine.

Here are sneak peeks of all the four May kits from all the My Creative Scrapbook design team.

May Main Kit Sneak Peeks
May Creative Kit Sneak Peeks

May LE Kit Sneak Peeks
May Album Kit Sneak Peeks
Are you excited about the reveal tomorrow? The designers have once again outdone themselves. Check back tomorrow for the full reveal and be sure to reserve your kits today!

Have a wonderful day!

Thursday, July 13, 2017

Summer Fun Layout

Happy Thursday! It's in the middle of summer here and it's been very hot so far this summer, but I am not complaining as the winters here are so long. Today I thought I would share another summer layout that I created with the gorgeous July Creative Kit at My Creative Scrapbook.


Scrapbooking to me should be fun and for this layout, I wanted to create some movement on the layout and make it more playful. 

I grabbed one of my dinner plates to use as a circle template and the border strip paper from the kit and traced out a circle with a pencil and then cut the paper strips apart.  I added some to the bottom left corner of the layout and the top right corner of the layout and machine stitched them down onto the white cardstock background.


I matted the photos onto the yellow and white polka dot paper


and added the chipboard yellow swimsuit and the "summer memories" sticker and "arrow" sticker in between the two photos to separate the photos and to draw the eye to the clustered title to the right of the photos.


From the ephemera pack in the July Creative Kit, I added the sun circle and layered it with the "summer" and "fun" chipboard pieces to complete the clustered embellishment title. I added a swimsuit chipboard piece to the right of the title.


The cute chipboard frames were combined and I clustered the "flamingo" chipboard piece to the right of the chipboard frames and added the "soak up the sun" chipboard piece to the bottom of the frames. I love to cluster embellishments and give the title more of a wow factor.


Finally, I sprinkled some tiny round ephemera pieces and round chipboard embellishments around the layout.


As you can see, I wanted to draw the eye from the bottom left corner of the layout upwards to the photos and then over to the top right hand corner of the page and then downwards to the title.

Feast your eyes on the beautiful July Creative Kit.


It is full of gorgeous papers, ephemera, stickers and chipboard stickers from the new Echo Park Summer Dreams line. I love the colors to this line. They are so bright and happy. 

Be sure and check out all the beautifully designed kits that My Creative Scrapbook puts together each and every month. There will surely be a kit that is perfect for you and your particular paper crafting style as they are all so different and jam packed with the latest and greatest papers and embellishments in the paper crafting industry.

Enjoy your day!


Tuesday, August 2, 2016

Make A Splash

Hello again! Hope you are having a great day so far.  Today my layout is featured over at Just Nick Digital Cut Files using the "Make A Splash" cut file that is included in the Summer Lovin cut file set.


I adore the title and wanted to make it pop off the page so I enlarged it and cut it out on black cardstock with my Silhouette Cameo.  After it was cut, I worked on my white cardstock background and "watercolored" the background with the Ranger Salty Ocean Distress Ink and then added some splatters and sequins to make it look like splashes.


For the patterned papers, I founds some papers from the October Afternoon Treasure Map Collection that I thought would go well with the theme of my page.  I tore three paper strips and machine stitched them to the left side of the page to direct the eye to the photos.  


On the left edge of my page I added a few strands of blue embroidery floss that I had in my stash and threaded the sequins onto the floss.  I thought it would give the page more interest.


I matted the two photos with some aqua vellum and added some embellishments around the page.  I used some flair buttons from A Flair For Buttons, some wood veneers, chipboard, enamel dots and some stickers on the top left and bottom right of my page.

It was so much fun creating this page.  I really love just having fun and getting inky and messy.  Have a great day!


Friday, October 30, 2015

We Are Family Too

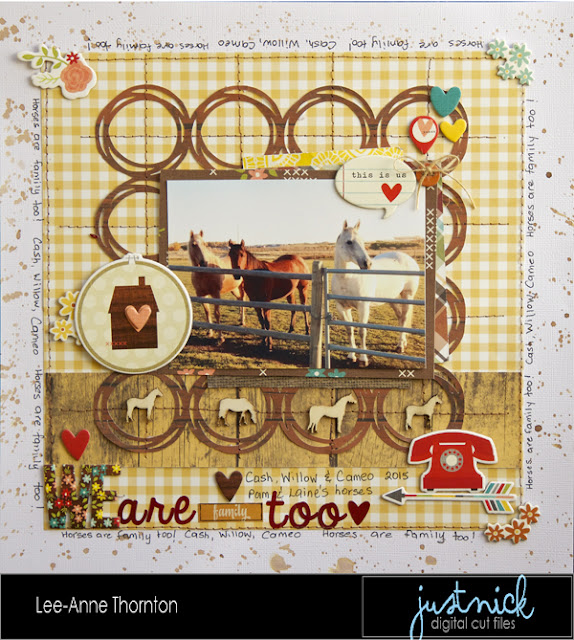
Hello friends! Happy Friday! Today I am sharing a layout at Just Nick Digital Cut Files using the Scribble Circle Background.  I love this fun background and decided to create a layout of my niece's horses.


I cut the background on my Silhouette Cameo on some woodgrain patterned paper and adhered it to the gingham yellow paper that is backed onto white card stock paper.  


  I machine stitched in brown thread over the center of the die cut circles going lengthwise and crosswise.  Then I added all my chipboard embellishments and matted the photo with several layers of patterned paper. 


 I added the title using some chipboard letters and stickers and added some cute wood veneer horse shapes that I had in my stash that would be perfect on this layout.  I wanted to give the layout a rustic, country feel.


Finally, I added some some distress ink splats in Gathered Twigs being sure to cover up the patterned paper so that it would only show up on the white card stock.

Here is a photo of the Scribble Circle Background.


All the patterned papers, stickers and chipboard embellishments are from the Pumpkin Spice and We Are Family Collections by Simple Stories.  

  This cut file and many, many more are available for purchase and instant download at Just Nick Digital Cut Files.

Thank you so much for stopping by and I hope you are inspired to use cut files in different ways.  Have a great day!


Saturday, October 17, 2015

I Love Simple Stories!

Hello friends! Happy Saturday!  Today I have another Fall layout to share.  Lately, I have been scrapbooking with a lot of Simple Stories collections and I decided to dig out a collection from last year called Sweater Weather.  I added in a woodgrain background paper from the new Pumpkin Spice Collection.  I love when I can use different collections on a layout from the same manufacturer.


I really wanted to use up some paper scraps so I used my square 3 1/2 inch square paper punch and punched out several papers, used my corner rounder on all four sides of each square and inked the edges with some Tim Holtz Distress Ink in Gathered Twigs. 

 I love to layer papers so I randomly layered the squares until I was happy with the placement and adhered them to the background woodgrain paper.  I added two photos that I also punched out with my square paper punch and rounded the corners.  I added a diecut for the title and embellished with some chipboard for dimension and added some enamel dots and word stickers.


I love Fall and love creating layouts using paper punches.  I hope you are inspired to take out and dust off your paper punches and create a layout or card.  Thanks for stopping by and hope you have a great day

Wednesday, April 29, 2015

You Are My Anchor Layout (A Flair For Buttons)

Hello friends!  Today I'm excited to share my first layout as a new design team member at  A Flair For Buttons.

I wanted to create a masculine layout of my husband but also keep it fun with some nautical accents to support the die cut title that I cut on my Silhouette Cameo.  I created this with October Afternoon's Treasure Map Collection of patterned papers and stickers.  I added some background stamping with a rubber stamp from Creative Embellishments and some sewing machine stitching.


The flair buttons I created this layout with are from these three different sets:

Il_570xN.509194547_cl1f
Il_570xN.586194902_9y1z
All these flair and many more are available in the store:
https://www.etsy.com/shop/aflairforbuttons

Also, don't forget you can save 15% off your entire order from now until Monday, May 4 by adding the coupon code NSD2015 when you checkout.


 Thanks for stopping by!