Showing posts with label machine stitching.. Show all posts

Tuesday, August 2, 2016

Make A Splash

Hello again! Hope you are having a great day so far.  Today my layout is featured over at Just Nick Digital Cut Files using the "Make A Splash" cut file that is included in the Summer Lovin cut file set.


I adore the title and wanted to make it pop off the page so I enlarged it and cut it out on black cardstock with my Silhouette Cameo.  After it was cut, I worked on my white cardstock background and "watercolored" the background with the Ranger Salty Ocean Distress Ink and then added some splatters and sequins to make it look like splashes.


For the patterned papers, I founds some papers from the October Afternoon Treasure Map Collection that I thought would go well with the theme of my page.  I tore three paper strips and machine stitched them to the left side of the page to direct the eye to the photos.  


On the left edge of my page I added a few strands of blue embroidery floss that I had in my stash and threaded the sequins onto the floss.  I thought it would give the page more interest.


I matted the two photos with some aqua vellum and added some embellishments around the page.  I used some flair buttons from A Flair For Buttons, some wood veneers, chipboard, enamel dots and some stickers on the top left and bottom right of my page.

It was so much fun creating this page.  I really love just having fun and getting inky and messy.  Have a great day!


Tuesday, March 8, 2016

Mom Layout

Hello everyone! Glad you stopped by!

I really love working with scrapbook kits because they take the guesswork out of matching papers, embellishments etc.  I am honored to be asked to play with such great scrapbook kits from My Creative Scrapbook.  Pam Rangel does a fantastic job each month designing the kits.  For March, I was excited to work with the Main kit as well as the Creative kit. They are both equally gorgeous. My Mind's Eye has always had my vote with such beautiful collections ever since they began in 1999. The Hello Gorgeous collection is no exception.

My mother is someone that I look up to and I always love to honor her with scrapbook layouts.  I took this photo last year on Mother's Day.


The grid design is one of my favorite designs for a layout. I love to pile on the embellishments and use up my paper scraps.  For this particular  layout, I began with a 12X12 piece of cardstock and took several Tim Holtz Distress Inks and went crazy dabbing them onto the cardstock to create this very colorful background.  It may have been overkill, but I still am happy how it turned out.  Later this month, I will be sharing a tutorial on how to create several backgrounds by simply using distress inks so keep checking back.

Here are a few detailed closeups:


Thanks for taking the time to stop by.  I really appreciate it.  I always welcome comments to see that people are reading my blog.

Have a great day and be sure to check out all the kits for March at My Creative Scrapbook.


Friday, October 30, 2015

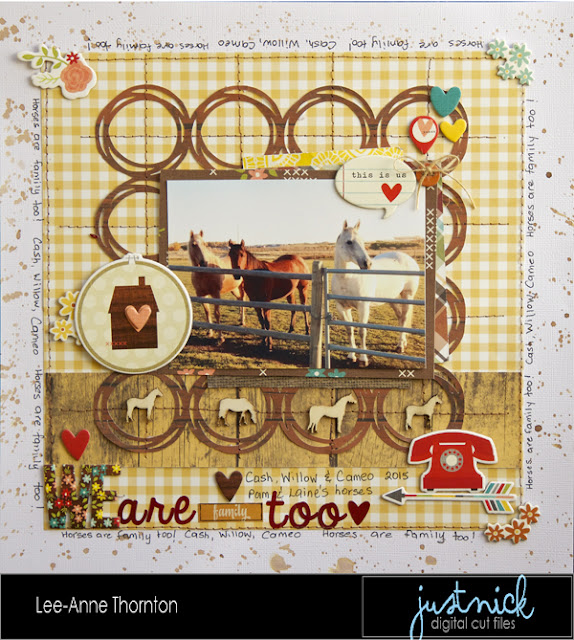
We Are Family Too

Hello friends! Happy Friday! Today I am sharing a layout at Just Nick Digital Cut Files using the Scribble Circle Background.  I love this fun background and decided to create a layout of my niece's horses.


I cut the background on my Silhouette Cameo on some woodgrain patterned paper and adhered it to the gingham yellow paper that is backed onto white card stock paper.  


  I machine stitched in brown thread over the center of the die cut circles going lengthwise and crosswise.  Then I added all my chipboard embellishments and matted the photo with several layers of patterned paper. 


 I added the title using some chipboard letters and stickers and added some cute wood veneer horse shapes that I had in my stash that would be perfect on this layout.  I wanted to give the layout a rustic, country feel.


Finally, I added some some distress ink splats in Gathered Twigs being sure to cover up the patterned paper so that it would only show up on the white card stock.

Here is a photo of the Scribble Circle Background.


All the patterned papers, stickers and chipboard embellishments are from the Pumpkin Spice and We Are Family Collections by Simple Stories.  

  This cut file and many, many more are available for purchase and instant download at Just Nick Digital Cut Files.

Thank you so much for stopping by and I hope you are inspired to use cut files in different ways.  Have a great day!


Thursday, February 19, 2015

Little Guy Layout

Hello friends and fellow scrapbookers! Today I wanted to share a layout that I created of Quinn using a circle paper punch a star paper punch and my antique sewing machine.


This layout was so fun to create. For the patterned papers, I used the Bella Blvd. Tiny Tots Collection and also some stickers, chipboard embellishments and die cuts.  I love Paige Evans style of scrapbooking and this layout was inspired by her style.

I cut the punched circles in half and placed them on the layout in a pattern and then machine stitched.


I punched some stars with a star paper punch and placed them around the photo to create a "frame"


The red and yellow crochet hearts and the blue feather were added for texture and dimension. 


I hope you enjoyed your visit today and are inspired to take out your paper punches and create a layout or card.  Thanks for stopping by!


Sunday, January 11, 2015

Summer Beach Bum Layout

Hello friends! I hope you are having an awesome day! Today I am sharing a summer layout at Creative Embellishments of my son and his friend when they were 7 years old and having some fun at the beach.


I found a cute digital cut file online that made me think of sunshine and beach umbrellas.  I wish I could remember where I found it so I could give credit where credit is due.  I cut the design out several times on my Silhouette Cameo. I then adhered them to the background paper and machine stitched around the designs.   I used the Creative Embellishments Circles Stamp, the chipboard Social Hash Tags, and the Sunny Days, Arrow and Peppermint wood shapes.  These are all available in the Creative Embellishments Online Store.


The wood shapes and hashtags were all painted with distress paints and acrylic paints before I glued them down.  I also added a journal card that I journaled on and then made it into a tag by punching a hole in the center and adding some twine.


Finally I added some stickers and a flair button.

I hope you enjoyed my layout.  Have a wonderful day and thanks for visiting my blog.


Thursday, December 4, 2014

'Tis The Season Layout

Hello friends! Today I am sharing a Christmas layout for Creative Embellishments that I created of my two older kiddos when they were little.  They are grown up now but I smile when I look at this photo of my son with his face painted and my daughter and son sitting on Santa’s lap at a company Christmas party.
IMG_3503
For this layout, I used the Creative Embellishments Snowflake Rubber Stamp and also the Grid Rubber Stamp  on the kraft card stock background and heat embossed it with some white embossing powder.  I then used white, green and red embossing powder and heat embossed the Wood Veneer SnowflakesChristmas Train and  Christmas Bulb. Next, I matted my photo and added papers and ephemera and  as well as a bow, doily and sewing machine stitching.  Finally, I added some journaling strips that I created on the computer, printed them out and outlined them in black pen and adhered them to some patterned paper.
IMG_3518

IMG_3514


I used the Merry & Bright Collection by Pink Paislee for the papers and ephemera and also some flair from A Flair For Buttons.
I hope I have inspired you to create a festive, holiday layout.  There are so many Christmas items in the Creative Embellishments shop. Thanks for stopping by!

Monday, November 10, 2014

Peace Love Joy Layout

Hello friends! I hope you had a good weekend.  I enjoyed my weekend as it was my birthday and my family spoiled me with cake and dinner so I had time to create this two page layout of my parents, my husband and three kiddos from last Christmas.  Last Christmas was pretty special because my two older children both work shift work and it has been about ten years since we were all together for Christmas.


It has been at least a year since I have created a two page layout, but I was inspired by a sketch designed by Debbie Sanders that I saw in the October 2014 issue of Scrapbook Generations Create.

This is my third layout with the Oh Deer Collection by Fancy Pants Designs.  I'm pretty sure I will use every morsel of this collection.  I pretty much followed the sketch and added some machine stitching, some flair from A Flair For Buttons and some cute little holly wood veneers from Creative Embellishments.  I chose kraft card stock as a background because I love that it coordinates nicely with so many colours.  Here are some more closeups.


This post if photo heavy because it is difficult to photograph a two page layout and see the details close up.  I hope you enjoyed your visit.  Have a wonderful day!