Showing posts with label diecuts. Show all posts

Saturday, September 16, 2017

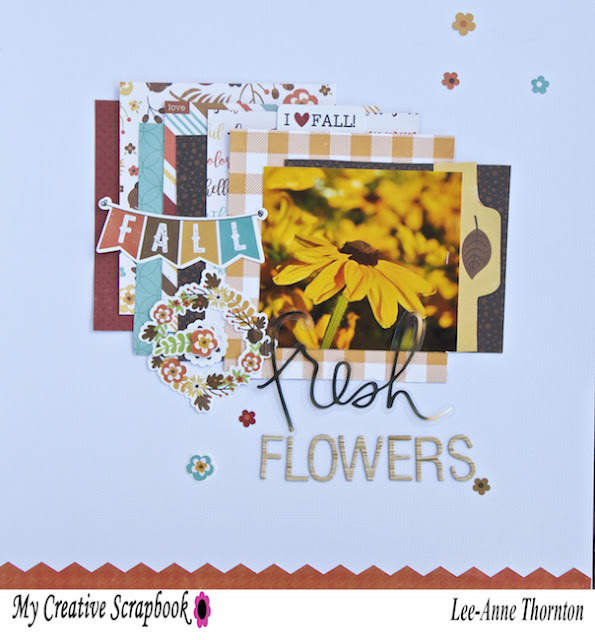
Fresh Flowers

Hello friends! If you are looking for the blog hop, please click here.

Today I am sharing my final and sixth layout using the September Creative Kit at My Creative Scrapbook.


For this layout, I added square scraps of patterned paper that I had left over from the kit and layered them on a white cardstock background.  


I placed the photo on the right and added some stickers to the left of the photo. 


For my title I added the word "Fresh" from the Heidi Swapp Gold Acetate Words and "Flowers" from the woodgrain chipboard included in the kit.


This was a fun, simple layout to create and it's a great way to use lots of papers and create layers.


Thanks for stopping by and be sure to check out all the September kits at My Creative Scrapbook. September is FREE gift month and with every September kit purchased there will be a free gift included in the kits. 

Also, there is a blog hop taking place right now with My Creative Scrapbook and Stuck?! Sketches. You can hop along here for a chance to win a beautiful September Main Kit and a gift certificate from Creative Embellishments.

Have a lovely weekend! 


Wednesday, November 23, 2016

My Creative Scrapbook November Tutorial

Hello friends! I am back with another post today sharing a step by step tutorial of how I created this layout using the new exclusive cut files, that are included with the November Main Kit at My Creative Scrapbook, and distress inks to give it a rustic mixed media look.


To create this layout you will need:

The My Creative Scrapbook November Main kit with the following items: 


  • Doily chipboard (cut in half),
  • Brads (as shown)
  • 12X12 inch sheet of brown woodgrain background paper
  • Creme lace ribbon


The following die cuts and stickers (included in the Main kit)


  • Bring On The Good Times
  • Family Memories
  • Grateful & Blessed
  • Happy & Loved
  • Together
  • We Are A Forever Family


Supplies that you will also need are:


  • 1 - 12X12 inch piece of white card stock
  • 1 - 3 X 3 inch black and white photo
  • Adhesive - liquid and also a tape runner type adhesive - (I use my Scotch ATG gun and also Tombow Mono Aqua Liquid Glue).
  • Dimensional Foam Tape, foam squares or foam dots (for dimension)
  • Heat Gun - If you don't have one, that is okay.  You can also air dry the leaf cut file.
  • Paper Towels (for wiping up after each ink application on the splat mat and cleaning the waterbrush after each color)
  • Ranger Distress Inks in the following colors:


Aged Mahogany
Scattered Straw
Evergreen Bough
Shabby Shutters
Wild Honey
Gathered Twigs


  • Scissors (to cut the lace ribbon for the left side of the layout and also the bow on the layout)
  • Silhouette Cameo, Cricut Explore or Brother Scan N Cut Electronic Die Cutting Machine (must be able to use png, svg, or dxf format files)
  • Splat mat
  • Water
  • Waterbrush (I use Prima brand, but any water brush will do or simply use a regular artist brush and also a glass of water )


Instructions:

Cut out the circular leaf cut file out of a sheet of white card stock with your electronic die cutting machine.

Using the splat mat, add the distress ink and some water and paint each leaf using the colors mentioned being sure to alternate colors so not two colors are beside each other.


Using a heat gun, dry the circular leaf cut file or air dry before moving ahead.


Now it is time to assemble your layout.

Beginning with the brown woodgrain paper, add the chipboard doily that has been cut in half and adhere to the top left and bottom right corner of the layout.


Add a large piece of the creme ribbon to the left side of the layout, fold over to the backside of the brown woodgrain paper and adhere to the back. Also, be sure to reserve some ribbon to create the bow that will be added later.

Add the inked circular leaf cut file, that has fully dried, to the center of the woodgrain brown paper and adhere with liquid adhesive.  I prefer to bend the leaf tips upwards to achieve more dimension.


Add the 3 X 3 inch black and white photo to the center of the circular leaf cut file and adhere to the brown wood grain paper.

Add the sticker "we are a forever family" to the top of the photo and the "family memories" to the bottom of the photo.


Add the "grateful + blessed" sticker, the "bring on the good times" die cut (that is popped up with foam squares), the "together" die cut (that is also popped up with foam squares) and the "happy + loved" sticker to the layout as shown.


Tie a bow with the creme ribbon and adhere with liquid adhesive below the "together" die cut.

Add brads to the layout as shown.


The layout is now complete!

I  hope you enjoyed this tutorial.  Have a wonderful, creative day! Be sure and check out the amazing kits at My Creative Scrapbook and subscribe today!


Saturday, May 30, 2015

Canada Layout For A Flair For Buttons

Hello friends! I hope you are having a good weekend so far.  If you are looking for the blog hop please go here.

Today I am up on the A Flair For Buttons  blog with another layout and today it's all about my country Canada.  The Canada Flair Buttons set have recently been added to the shop and when I saw these I had to create a layout.  I painted my nation's colors of red and white and die cut some maple leaves (which are on the Canada Flag) on my Silhouette Cameo as well as the Canada die cut title.  I also used some washi tape and stickers from Bella Blvd. as well as some Tim Holtz Distress Paints in the colors Picket Fence and Barn Door.


Here is the flair button set that I created with for this layout.  It can be found in the A Flair For Buttons Store.

Canada Flair
Thanks for stopping by my blog.  Have an awesome weekend!


Saturday, October 25, 2014

Cat Pumpkins Layout

Happy Saturday friends! Today I would like to share a layout I created with the Fancy Pants Designs True Friends Collection.  I thought the colours were perfect for my cat halloween pumpkin that I carved.


I found this cute pumpkin cut file online and I really can't remember who shared it, but thank you! The pumpkins title is a free cut file from Kerri Bradford.  I cut the pumpkin shape and the title from my Silhouette Cameo.  I then added several strips of patterned paper behind the pumpkin die cut, matted the photos, splattered some mist for interest and added some flair, stickers and a wood embellishment and then matted the layout on a piece of corrugated paper.


I hope you enjoyed your visit. Thanks so much for stopping by.  I hope you have a great day!

Supplies

Corrugated Paper - Fancy Pants Designs
Diecutting Machine - Silhouette Cameo
Flair - A Flair For Buttons
Mists - Heidi Swapp
Patterned Papers - Fancy Pants Designs (True Friends Collection)
Stickers - Fancy Pants Designs
Wood Embellishment - Jillibean Soup


Thursday, April 4, 2013

Sketches In Thyme Sketch #107

Hello everyone!

Today at Sketches In Thyme we are revealing Sketch #107.  It is a fun sketch and I liked working with it.

Sketches In Thyme #107
I chose to do an layout about Easter and the task of coloring eggs.  My children are too old to enjoy this, so I still color some eggs for my dad who loves hard boiled colored eggs for his breakfasts.  I chose a new collection by Doodlebug Design that is named "Flowerbox".  I also added some brads, from my stash, that are also from Doodlebug Design dated 2009.  It's great to mix new products with old products.

This layout is out for publication in Canadian Scrapbooker Magazine Spring 2014 issue!


On this layout, I used some washi tape and stickers, also by Doodlebug Design, as well as some diecuts that I created with my Silhouette Cameo for the title, the eggs, the grass border, and the scalloped oval shape behind the title.  Finally, I finished the title and eggs with some Stickles in Thistle, Orange Peel, Waterfall, and Yellow to give some glitter to the die cuts.

I hope you like my layout and I also hope that you are inspired to create a layout with this fabulous sketch.  Be sure to stop by Sketches In Thyme to see what the other designers have created with this sketch and also to upload your creation for this sketch for a chance to be our May guest designer!  How cool is that?

Thanks for stopping by and have a creative day!